


LG-10 thru LG-30 - User Manual Electro-Steam Generator Corp.
7 of 33
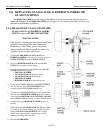
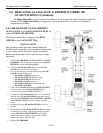
3.2) CLEANING WATER LEVEL PROBES (Continued)
6. Clean probes to remove rust and scaling.
NOTE: To clean probes you may use wire wheel, wire brush, steal wool, or Scotch-Brite.
(Wire wheel works the best) You may also want to try some sort of chemical like CLR
remover or LIME-A-WAY.
7. Reinstall probes assuring each probe’s length is assigned to its proper letter.
8. Reconnect wires to probes assuring each color is also assigned to its proper letter.
NOTE: DO NOT make wires too tight. Just tighten enough to make contact. Over
tightening can cause probe plugs to pull apart over time.
9. Reinstall cover plate.
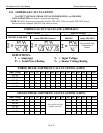
Water Level Probe Specifications:
Letter Assignment on Chamber A B C D/G
Water Level Probe Length 4 ½” 4 ¾” 3 ¾” 4 ¾”
Wire Color Assignment RED Not Used
BLACK
GREEN
Assignment on Dual Function Board LLCO Not Used
H G
NOTE: The (B) Probe is not used. It is a spare probe that can be cut and used to replace any one
of the other probes.
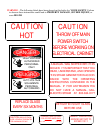
WARNING – There MUST be NO PRESSURE in the chamber when removing probes. If you
must change probes while chamber is HOT, make sure the steam out and drain valves are open
to assure chamber will remain depressurized. DO NOT touch probes with your bare hands
while HOT, and be cautious of escaping steam from probe holes while probes are removed.
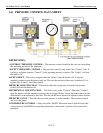
3.3) CLEANING OR REPLACING HEATERS
Heaters are located inside the control panel (#1) below the insulation barrier, bolted into the
chamber. If (3.5) Chamber Chemical/Acid Treatments are not regularly done, heaters must be
taken out at least ONCE A YEAR, cleaned with wire brush and reinstalled using a new gasket.
If you are replacing or cleaning your heater elements:
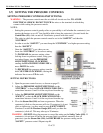
1. Place Toggle Switch (#2) and Main Disconnect Box in OFF position.
2. Make sure generator is cool and the Pressure Gauge (#15) reads 0 PSI.
3. Remove heater wires from heater(s), using an 11/32” or 3/8” Socket.
4. Unbolt and remove heater(s) using a 1/2” Socket.
NOTE: Heater(s) may be difficult to get out; you may need to use some sort of pry bar to
get them loose.
5. Clean heater(s) with wire brush. If replacing, dispose of old heater(s).
6. Reinstall heater(s) with new gasket(s).
7. Attach heater wires assuring proper wiring. *Refer to Heater Wiring Schematics
attached*
NOTE: If you are replacing a heater because of a heater failure, you must also clean the probes
and clean out the chamber, or you may have another heater failure within 48 hours.