


15
GB
• use expansion bolts to fix the mounting supports on the wall
• use bolts and nuts to fix the outdoor unit firmly on the supports and keep on the
same level
• if the unit is installed on the wall or at the roof top, the supports have to be firmly
fixed to resist earthquake or strong wind.
PIPELINES CONNECTION
Ordinary pipeline connection (suitable for non-quick coupler)
No dust, foreign objects, air or moisture should be allowed to enter the air
conditioning system. Careful attention should be paid when the pipeline connection
for the outdoor unit is made. Avoid (repeated) curves as much as possible,
otherwise hardening or cracks might be caused to the pipes. Suitable wrenches
should be used when the pipeline connection is done to ensure appropriate torque.
Excessive torque might damage the joints while too little torque might lead to
leakage.
For pipes vacuuming, see “Exhaust air” paragraph.
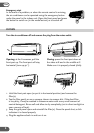
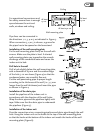
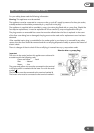
Connect the indoor connections (suitable for quick coupler)
Be aware that it is possible to connect the connectors only in one way. Follow the
procedure below:
a. Remove the 4 dust caps from indoor connectors
(unit and pipes).
b. Align the joint counter to the connecting pipe
with the proper joint, tighten the connecting nuts
manually. Then, make it secure with a wrench
applying torque as shown in the table. If a torque
meter is not available, secure the connector with
1 turn after manual secure.
c. Connect the drain hose to the indoor drain outlet. Wrap the drain tube with the
refrigerant tubes tightly with tape. Make sure that the drain pipe is underneath
the pipelines.
d. Connect the electric plugs, and place it above tubing in the back side of the unit.
High pressure valve
Valve core cap
Low pressure valve
Quick coupler
(wrapping with insulating
c
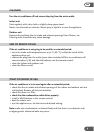
Diameter of the copper pipe Tightening torque
[“] / [mm] [kgf*m] [Lbs/feet]
1/4” / 6.35 mm 1.6 11.6
3/8” / 9.52 mm 3.0 21.7
Torque wrench
Spanner
Joint
Nut of
connecting pipe