506920−01 09/12
Page 24
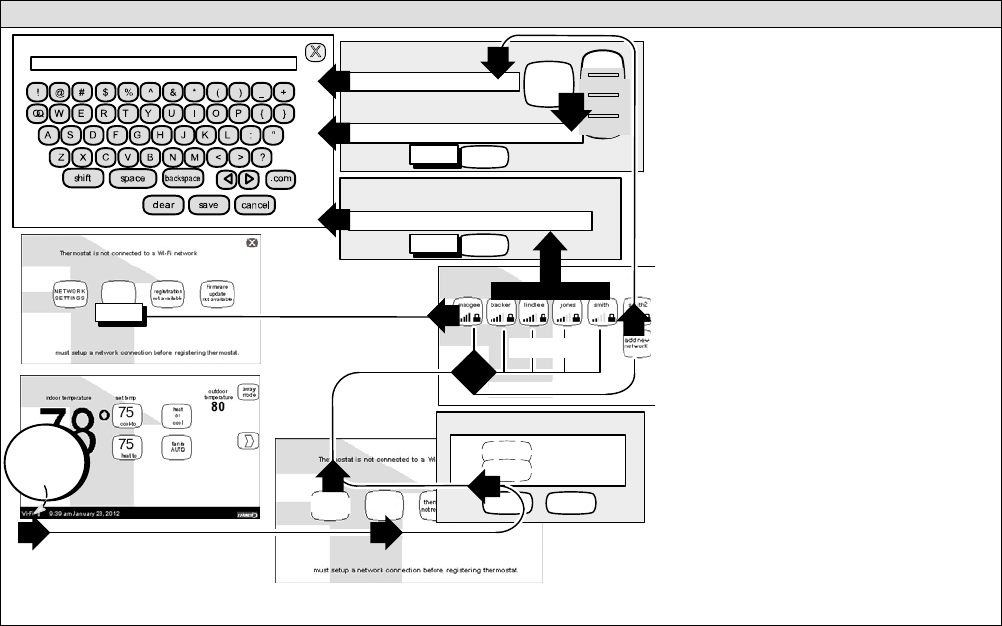
Enable the thermostat’s Wi-Fi feature from the Home screen
press any line to edit it
connect
password
security
is WPA2
network name (SSID)
type the network security key or passphrase for
(locked Wi−Fi Access Point [AP])
network security key or passphrase
press here to enter network name
press here to enter Wi−Fi AP (router) password
displays information here as keys pressed
User Agreement
accept decline
connect
press here to enter Wi−Fi AP (router) password
next...
next...
5.2 CREATE NEW AP
1
START
HERE
WI−FI SETTINGS
WI−FI SETTINGS
NETWORKSETTINGS
Wi−Fi
enable
NETWORK
SETTINGS
Wi−Fi
disable
none
WEP
WPA
WPA2
WEP
WPA
WPA2
Figure 27. Wi−Fi setup
Secure Connection Recommended!
Make sure the router is capable of, and set to operate in
wireless network b" mode. Check router utility program or
contact service provider for help. A secure wireless net-
work is recommended over an open (unsecured) network.
You will need the homeowner’s approval and router pass-
word to enable Wi−Fi in a secured connection.
Enable Wi−FiĊTo enable the Wi−Fi feature to com-
municate with a wireless router:
1. Press and release Wi−Fi" in the lower left corner of
the HOME screen (see START HERE). The screen
changes from the Home Screen to the WI−FI SET-
TINGS screen.
2. Press the Wi−Fi enable button.
3. Press next as necessary; then press accept after
reading the User Agreement.
4. Press NETWORK SETTINGS; this screen shows a
graphical view of buttons representing Wi−Fi options
OPEN and SECURE wireless networks and a button
for creating a new access point (AP).
5. Decide which of the following buttons you need to
select:
5.0ĊOPEN Wi−Fi Port (no password required).
5.1ĊSECURE Ports (requires router password).
5.2ĊCreate new AP (Access Point).
5.2aĊWhen creating a new AP, you have the option
of selecting a security level (default is none; choose
from WEP, WPA, WPA2, depending on the security
defined in the homeowner’s router); the password
field appears.
6. When you touch in one of the input fields (press here
to enter...), the keyboard tool appears. Enter pass-
word (if simply logging into an existing network) or
enter the network name if creating a new AP. If you
mistype the password or if you cannot access the
selected network, a message will alert you to retry.
7. Press connect to complete the connection. Note
that Wi−Fi enable" button on the Wi−Fi SETTINGS
screen changes to Wi−Fi disable".
7 END
7 END
7 END
5.0 UNSECU-
RED ACCESS
POINT
5.1 SECURE
Access Points
6
2
4
5.2
5.2
5.1
3
1
6
6
5.2
a
5?
5.0
Wi−Fi


