


2
NOTE: DIAGRAMS & ILLUSTRATIONS NOT TO SCALE.
# 8-32
Sheet Metal Screw
(Three Places)
1"
Adjustable
Slip Section
(Sweaged
Side At Top)
Outer Collar
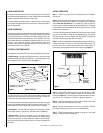
Figure 1 Chase Flashing
Too short of a collar or no collar at all will allow water to seep into the
chase around the outside of the pipe system, and too tall of a collar will
interfere with the proper attachment of the termination.
The collared opening must be large enough to allow for the direct vent pipe
system to be installed and the termination outer collar to move freely. The
collared opening can be no larger than nine (9) inched in diameter.
• Strap Support - The SV4.5SU strap support is to be used for keeping
the vent pipe system in the center of the chase (
refer to Figure 3
).
• Silicone Caulk - This is to be used for the final sealing of the
installation. The collar must be properly sealed to the chase flashing
with appropriate caulk. Hi-Temp sealant P/N 10K81 is recommended.
Failure to properly seal the collared opening will result in leakage into
the chase.
INSTALLATION STEPS
Step 1. Install the gas appliance in accordance with its installation
instructions.
Step 2. Determine the chimney height vent configuration and number of
strait direct vent pipe sections required to bring the top of the last pipe
section flush with the chase top. Two inches (2") maximum above to
three inches (3") maximum below are the acceptable limits. Please see
the Installation Instructions accessories list for pipe information. Install
the direct vent pipe system.
If the top of the last pipe section exceeds the 3" maximum from the chase
top (up to 5" maximum), please use an adjustable length slip section
SV4.5LA (Cat. No. 77L75) or SV8LA (Cat. No. H2255) to engage the
termination with the pipe. See Step 3 for details.
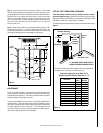
Step 3. Install the sweaged side of the adjustable pipe section all the way
inside the termination. Secure it with three sheet metal screws (not
provided) one inch (1") above the termination outer collar bottom, in
three equally spaced places around the termination (
see Figure 2
).
CHASE CONSTRUCTION
The chase is a hollow vertical enclosure framed as a part of the building
and covered with a suitable exterior veneer. Always consult local building
codes for approved chase construction techniques.
The chase flashing, fabricated locally, is used to anchor the termination
to the chase. The flashing should be constructed to overlap the chase to
seal out the elements.
CHASE DIMENSIONS
The chase must be large enough to accommodate the vent system and its
required clearances to combustibles. The base of the Direct Vent Chase
Top Vertical Termination is nineteen and five eights inches (19 5/8" ) for
the SV4.5CTS and twenty three inches (23") for the SV8CTS. The chase
and its chase flashing must exceed those dimensions by one (1) inch on
all sides. This means the minimum chase dimensions must be a
minimum of twenty one and five eights inches (21 5/8" ) for the SV4.5CTS
and twenty five (25") for the SV8CTS.
TO INSTALL THE TERMINATION
The installation of this termination also requires additional components.
• Chase Flashing - The flashing should be a minimum 0.018" thick G90
galvanized steel or equivalent per ASTM 525. The chase flashing must
have, integrated into it, a vertical collar (
see Figure 1
).
*9"
(229 mm) I.D.
3/4" (38 mm) Min. to
2" (51 mm) Max.
2"
(51 mm)
**21-5/8" Min.
(550 mm)
**21-5/8" Min.
(550 mm)
*For SV8CTS - 12” (305 mm) I.D.
**For SV8CTS - 25” (635 mm)
Step 4. Install the SV4.5 pipe strap support (Cat. No. 96K93) or SV8SU
pipe strap support (Cat. No. H2262) to keep the vent system from
moving (
see Figure 3
). The strap support should be placed a minimum
of one foot (1') to a maximum of 2 feet (2') below the chase top.
Step 5. Install the chase flashing on the top of the chase. Secure the
flashing to the top of the chase, using 8d nails.
Step 6. Connect the termination with the top pipe section. Slide the
termination inside pipe and lower it onto the chase flashing.
Step 7. Rotate the termination as needed to square it to the chase
flashing for proper aesthetic appearance.
Figure 2