


17
Operating Instructions
Pre-Lighting Checklist
Be sure to check these items before the initial lighting of the insert:
cThe insert gas label corresponds to the gas supply available -
that is "natural gas" for natural gas or "LP gas" for LP gas.
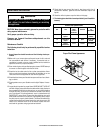
cGas pressure has been checked carefully - see Page 14.
cAll gas fittings have been checked for leaks.
cAll clearances to combustibles have been met-see Page 10.
cAll combustible materials have been removed from the area in
front of the insert.
cAll vented areas of the insert face are unobstructed.
cHouse is ventilated to clear initial paint curing odors - see Page
19.
cAll packaging materials have been removed from the firebox.
cWhile appliance is cool, fingerprints or other marks have been
cleaned from any gold or nickel surfaces with denatured alcohol
and a soft cloth. Marks left on these surfaces may become
permanent into the finish if not removed prior to burning the
unit.
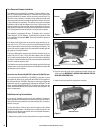
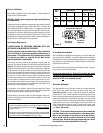
cBrick panels and log set have been installed.
cThe glass door is in place and is properly sealed.
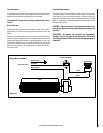
Lighting Instructions
CAUTION: HOT WHILE IN OPERATION. DO NOT TOUCH. KEEP
CHILDREN, FURNITURE, GASOLINE AND OTHER LIQUIDS WITH
FLAMMABLE VAPORS AWAY. NEVER OPERATE UNIT WITH GLASS
OFF OR ATTEMPT TO REMOVE THE GLASS WHILE HOT.
CAUTION: YOUR LENNOX HEARTH PRODUCTS GAS APPLIANCE
MUST ALWAYS BE OPERATED WITH GLASS IN PLACE.
The following is a copy of the operating and lighting instructions
found with each insert:
FOR YOUR SAFETY READ BEFORE LIGHTING
WHAT TO DO IF YOU SMELL GAS:
• DO NOT try to light the appliance.
• DO NOT touch any electric switch; do not use any phone in
your building.
• Immediately call your gas supplier from a neighbor's phone.
Follow the gas supplier's instructions.
• If you cannot reach your gas supplier, call the fire department.
C. Use only your hand to push in or turn the gas control knob.
Never use tools. If the knob will not push in or turn by hand,
don't try to repair it, call a qualified service technician. Force
or attempted repair may result in a fire or explosion.
D. DO NOT use this appliance if any part has been under water.
Immediately call a qualified service technician to inspect the
appliance and to replace any part of the control system and any
gas control which has been under water.
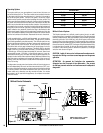
LIGHTING INSTRUCTIONS
1. STOP!! Read the safety information on this page before
proceeding.
2. (If applicable) Set the thermostat to lowest setting. Turn wall
on/off switch, unit mounted on/off switch or remote control
switch "OFF."
3. Turn off ALL electrical power to the appliance.
4. Open the lower door to access control compartment. Make sure
gas supply shut-off cocks are open.
5. Push in gas cock dial slightly and turn clockwise to
"OFF."
Note: Dial cannot be turned from "PILOT" to "OFF" unless dial
is pushed in slightly. Do not force.
6. Wait five (5) minutes to clear out any gas. Then smell for gas,
including near the floor. If you smell gas, STOP! Follow "B" on
this page. If you don't smell gas, go to the next step.
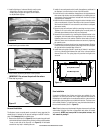
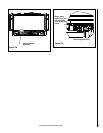
7. Locate the pilot by looking over the top of the left front log. A
blue flame will be seen when the pilot is lit.
8. Turn the gas control knob counterclockwise to "PILOT."
OPERATION
A. This appliance is equipped with a piezo ignition device to light
the pilot. When lighting the pilot, follow these instructions
exactly.
B. BEFORE LIGHTING, smell around the appliance area for gas.
Be sure to smell next to the floor because some gas is heavier
than air and will settle on the floor.
WARNING: IF YOU DO NOT FOLLOW THESE INSTRUCTIONS
EXACTLY, A FIRE OR EXPLOSION MAY RESULT CAUSING
PROPERTY DAMAGE, INJURY, OR LOSS OF LIFE.