


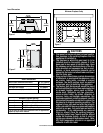


13
NOTE: DIAGRAMS & ILLUSTRATIONS ARE NOT TO SCALE.
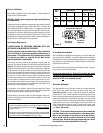
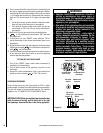
4. Install a light layer of rockwool directly over the ports.
- A light layer will give a more constant rear flame.
- A heavy layer will give more glow, but will need to
be adjusted after light up.
5. Install front logs on retainer slots.
Face Installation
A number of different face finishes and styles are available for your
appliance. The Arch face comes with a sight obstructor that must be
installed prior to installing the surround panels and face. Instructions for
installing the sight obstructor are included with the face. The faces come
with hooked brackets. To install the face, hang the hooked brackets on
the surround brackets (See C in Figure 13).
Note: Plated surfaces must be cleaned with glass cleaner and a soft clean
cloth before firing the first time or fingerprints and stains will remain
permanently. NEVER use brass polish to clean plated surfaces, this
will remove the plating!!!
2. Install all surround panels and trim with the appliance positioned in
the fireplace, but a few inches in front of its final location.
3. If an Arch face is to be installed on the appliance, the sight obstructor
that comes with the face must be installed prior to installing the sur-
round panels. See the instructions included with the face for proper
sight obstructor installation.
4. Install the side surround panels by lining up the holes in the tabs on the
side surround panels in front of the holes on the surround brackets.
Next insert two slotted 1/4" truss screws for each side surround panel
and secure loosely.
5. Fasten the top surround panel with the remaining two truss screws.
Tighten all six truss screws after adjusting the surround panels to
eliminate space between side and top surround panels.
6. Assemble the surround trim by inserting the elbowed retainer in the
rectangular slot in the ends of the longest piece of trim and secure by
tightening the screw in the retainer. Slide the mitred ends of the two
side trim pieces onto the elbowed retainer and secure by tightening
the retainer screw.
7. The fastened trim pieces should now be horseshoe shaped. Slide the
trim down over the surround panels so the edge of the surround panel
fits just behind the rounded edge of the trim.
8. Install three spring clips (found in parts bag in firebox) in each piece
of trim by inserting them between the rear of the surround and the
channel of the trim. The spring clips will push the trim tight to the
surround.
6. Place embers around the perimeter of the rockwool.
IMPORTANT!!! Do not cover the ports with the embers.
7. Place top log on pin.
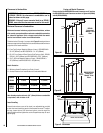
Surround Installation
The fireplace insert surround panels are made of heavy gage steel for
durability and, if desired, for the ease of making an inside fit in the fire-
place. See Packaging List for available sizes.
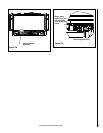
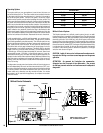
1. Remove the speed nuts (A in Figure 13) from the parts bag and install
(with the flat surface forward) on the six holes in the surround brackets
- three on each side of the insert (B in in Figure 13). A flat bladed
screwdriver may help in installing the nuts.
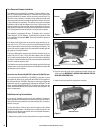
Figure 10
Figure 11
A
Figure 13
B
C
Spring Handle Latches
Door Mounting Plates
Figure 12
Front Logs
Top Log
Ports