


10
NOTE: DIAGRAMS & ILLUSTRATIONS ARE NOT TO SCALE.
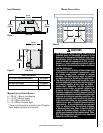
zero ClearanCe fireplaCe installation
This insert may be installed in a masonry or factory built/zero
clearance (ZC) fireplace. When installing in a ZC fireplace,
the ZC grate must be removed and the ZC damper must be
removed or secured open. The ZC doors, screen, refractory
or masonry lining, baffles, and smoke shelf may be removed
if necessary to install the gas insert. However, do not cut or
alter the fireplace components. The removal of any parts to
facilitate installation must not alter the integrity of the inner or
outer shells of the fireplace cabinet. Any parts removed must
be replaceable if the insert is taken out of the fireplace or the
fireplace clearly marked with a paint stick that "This fireplace
has been altered and is no longer safe to operate."
The insert is designed to fit into a ZC fireplace with a mini
-
mum firebox height of 19-1/2" (495mm). To facilitate this
the hood will need to be removed and discarded (Note: the
screws should be replaced in the insert body).
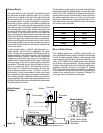
If the factory-built fireplace has no gas access hole(s) pro
-
vided, an access hole of 1-1/2" (37.5 mm) or less may be
drilled through the lower sides or bottom of the firebox in
a proper workmanship like manner. This access hole must
be plugged with a non-combustible insulation after the gas
supply line has been installed.
The installer must mechanically attach the marking supplied
with the gas fireplace insert to the inside of the firebox of the
fireplace into which the gas fireplace insert is installed.
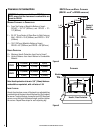
ravenna™ 33 Conversion to ravenna 40
To convert to a Ravenna 40 gas insert, after step 1 remove
and replace the stock burner orifice with the 0.125" NG
orifice supplied in the installation manual bag. Pipe dope
or other approved gas line sealant will need to be applied
before inserting into bulkhead. The foil sticker on the light
-
ing label stating RDV33 will need to be removed. RDV40
will appear underneath.
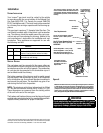
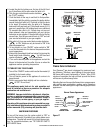
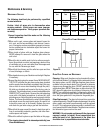
briCk panel & log set installation
1. Remove the log rack (2 screws) and install the rear log
on the retainer.
Retainer
Rear log
2. Place the rear brick panel on the brackets and reinstall the
log rack with the rear log.
IMPORTANT!!! SCREWS PASS
THROUGH THE LOG RACK AND THE BURNER PAN.
3. Install the side brick panels by sliding them into place.
Side Brick Panels
Figure 7
Figure 8
Figure 9
2 Screws