


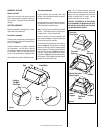
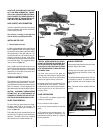


NOTE: DIAGRAMS & ILLUSTRATIONS NOT TO SCALE.
7
UNIT ACTIVATION
At this time all connections should be made
and tested to assure proper operation.
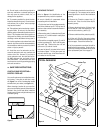
1. Locate the DVD disk for the DVD player in the
envelope with these instructions. Remove the
disk and set it aside. It will be installed shortly.
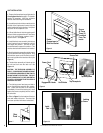
2. Locate the florescent bulb in the bottom of
ember compartment and install it into the
socket at that location (
refer to Figure 8
).
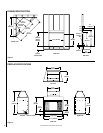
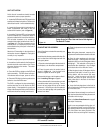
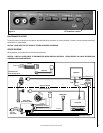
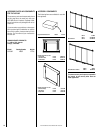
3. Locate the Television RCA cord, suspended
from the fireplace top. Connect this cable to
the jacks located at the front of the television.
The red cable connector is for sound and
connects to the audio jack at the front of the TV
(
see Figure 11
). The other connector may be
white or yellow. This connector is for the video
and connects to the yellow jack in the front of
the television.
Attach the IR transmitter to the television at
the location shown in
Figure 11
. Placing this
correctly is very important.
The unit is ready to power-up for the first time.
4. Locate the circuit breaker for the fireplace at
the main electrical source and turn it on. Press
the power button on the remote. The ember
light will come on.
5. Press the DVD tray button on the DVD and
wait momentarily. The DVD drawer will open.
If the drawer does not open, power is not on.
6. Place the DVD disk into the tray and use the
button to close the DVD drawer.
The DVD is configured to play automatically
and the television is set to receive the DVD
signal directly. If the operation is correct, and
image of the flame should be on the Television
and sound should be coming from the unit.
COMPLETING THE ASSEMBLY
After all functions are tested the assembly can
be completed.
Install the side refractory panels at this time. Be
sure to select the side that align best with the
back grout pattern.
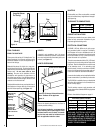
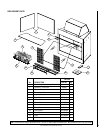
1. Place the ember bed against the back wall of
the fireplace, over the ember compartment.
2. Place the grate onto the ember bed as
shown in
Figure 12
. Use the back brick
pattern as a guide to center the grate.
3. Assemble the logs onto the grate as identi-
fied in Installing The Logs on page 9
.
4. Pour elements of the loose embers over and
around the ember bed to your liking. Turn on
the unit to help judge the look of the ember
placement. It is best to pour all of the material
to cover the leading edge and spreading the
embers from there.
Figure 11
5. Check the placement one last time before
continuing.
Note: After glass placement, removing it for
adjustment is awkward and should be avoided.
6. Open the glass package and clean both
sides thoroughly. Cotton gloves have been
supplied to allow you to hold the glass without
smudging it. The underside of the glass is
inaccessible after installation. Any smudges
on the back side will be difficult to clean.
7. After the glass is clean, lift the glass with the
gloved hand and hold it in front of you like a
serving platter, with the narrow side away
from you. Insert the narrow end into the
fireplace and press the glass onto the two
black rubber tabs in the back of the firebox
(see
Figure 13
).
8. Lower the front edge down to the front lip
of the fireplace and hook the glass behind the
lip in the base cover.
If you haven't done so already, turn on the unit.
Step back and examine the flame placement in
correlation with the logs.
Refer to the Glass Frame Removal on page 9
and adjust if necessary.
A grill cover was packaged with the door rail.
This component inserts over the DVD player
tray opening with the Lennox logo on the right.
Two velcro dots have been provided in the
hardware kit to secure the grille if necessary.
IR Transmitter Location
Figure 12
Center Grate On Ember Bed And Center Both Against
The Back Of Firebox