


8
NOTE: DIAGRAMS & ILLUSTRATIONS NOT TO SCALE.
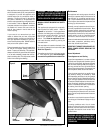
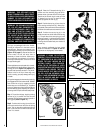
Figure 10
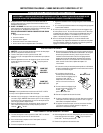
Figure 12
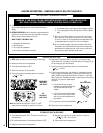
Figure 11
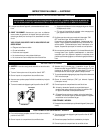
a.
b.
c.
e.
d.
7"
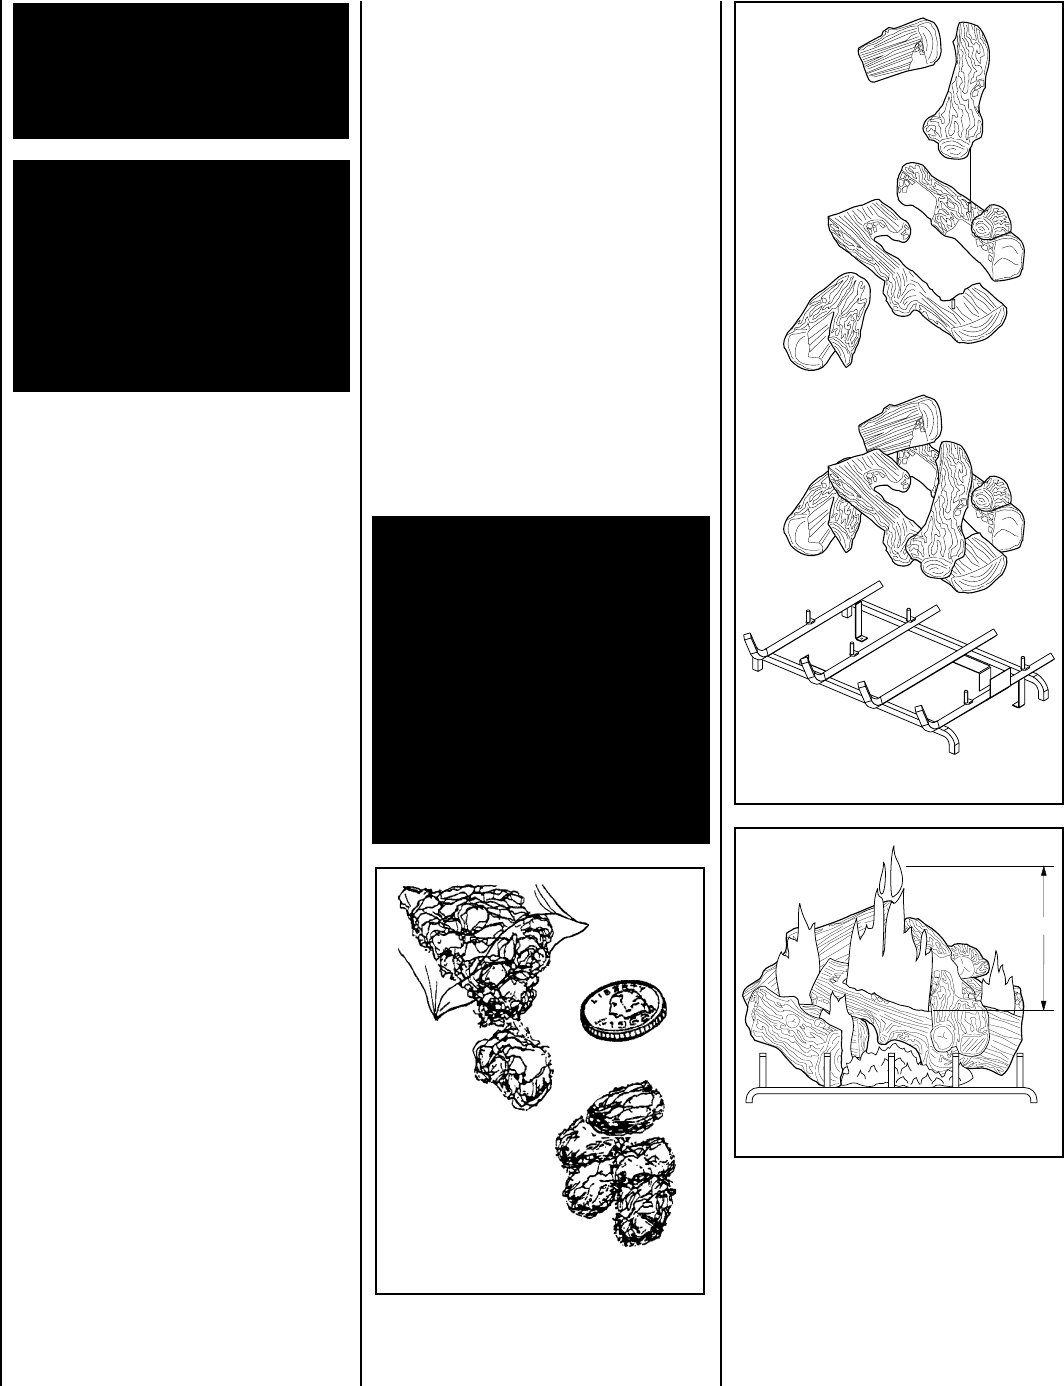
Step 3. Place the "C" shaped main log (b) in
position over the remaining log grate pin lo-
cated at the far right near the front of the grate.
The left end of the main log is to rest upon the
"V" shaped front log with its back left edge
butted up against the rear log (c).
Step 4. Position the top log (d) over the pins
in the rear log and the main log. When prop-
erly placed, the top will have its charred area to
the left and the stubbed end toward the front.
Step 5. Position the rear top log (e) in the
pocket formed over the left side of the rear log
(c). The split face of the rear top log (e) must
be facing forward, It's left end should be down
fully against the log rack, and the crook (bend)
in the log should break directly over the end of
the rear log.
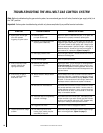
When properly positioned the logs should
appear as illustrated in
Figures 11 and 12.
Logs must not impinge any of the flames.
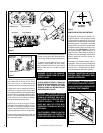
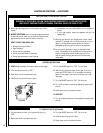
The logs are packaged within the firebox.
The bag of rockwool is in the lower control
compartment. Remove the rockwool from
the packaging and tear into dime size pieces
(
Figure 10 on page 8
). Spread across the
burner evenly. Do not use more than is
necessary to cover the burner. When prop-
erly positioned, the rockwool will unevenly
cover approximately 85% of the burner with
no appreciable gaps.
These appliances are equipped with a beauti-
fully crafted five (5) piece ceramic fiber log set.
The logs, shown in
Figure 11 on page 8
, are to
be positioned precisely as shown. Any modi-
fication to the to the lay of these logs may
result in sooting, property damage and injury
or death.
All logs that engage pins have mating holes for
pin engagement on their bottom sides. DO NOT
force a hole into a log by engaging the pins
where they are not intended to go. Apparent
minor mis-alignment of the pins and holes can
be eliminated by gently adjusting the position
of the logs until the pins and holes easily mate.
Step 1. To position the logs, begin by placing
the rear log (c) in position over the two pins
located at the right center rear and right rear of
the log grate
(refer to Figure 11 ).
Step2. Position the front log (a) over the two
pins found near the front left corner of the log
grate. This log should be positioned with the
split "V" notch to the front with the bulkier half
of the "V" to the left.
WARNING: IF USING THE OPTIONAL
EMBER KIT, DO NOT PLACE ANY OF THE
KIT COMPONENTS IN ANY LOCATION
WHERE THEY MAY IMPINGE ON THE
LOFTING FLAMES. GIVE CONSIDER-
ATION TO THE POTENTIAL OF LATER
INADVERTENT DISLOCATION OF THESE
ELEMENTS AND ENSURE THEY ARE
PLACED WHERE THEY MAY NOT FALL
OR ROLL INTO AN IMPINGING LOCA-
TION. FLAME IMPINGEMENT WILL RE-
SULT IN SOOTING AND MAY CAUSE
SERIOUS INJURY OR DEATH.
WARNING: THIS APPLIANCE IS NOT
MEANT TO BURN WOOD. ANY ATTEMPT
TO DO SO COULD CAUSE IRREPARABLE
DAMAGE TO YOUR APPLIANCE AND
PROVE HAZARDOUS TO YOUR SAFETY.
WARNING: THE SIZE AND POSITION OF
THE LOG SET WAS ENGINEERED TO
GIVE YOUR APPLIANCE A SAFE, RELI-
ABLE AND ATTRACTIVE FLAME PAT-
TERN. ANY ATTEMPT TO USE A DIFFER-
ENT LOG SET IN THE FIREPLACE WILL
VOID THE WARRANTY AND WILL RE-
SULT IN INCOMPLETE COMBUSTION,
SOOTING, AND POOR FLAME QUALITY.