


NOTE: DIAGRAMS & ILLUSTRATIONS ARE NOT TO SCALE.
4
MAINTENANCE
The appliance and venting system should be
thoroughly inspected before initial use and at
least annually by a qualifi ed service technician.
However, more frequent periodic inspections
and cleanings should be performed by the
homeowner. Homeowner must contact a quali-
fi ed service technician at once if any abnormal
condition is observed.
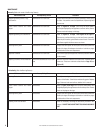
Refer to the maintenance schedule on Page
6 for maintenance tasks, procedures, recom-
mended frequency and by whom they should
be performed. Always verify proper operation
of the appliance after servicing.
Always turn off the gas and unplug the power
cord to the appliance before cleaning. Before
re-lighting, refer to the lighting instructions in
this manual. Instructions are also found on
pull-out panels located below the glass door
in the control compartment.
Keep lower control compartment clean by
vacuuming or brushing at least twice a year.
More frequent cleaning may be required due to
excessive lint from carpeting, bedding materials,
etc. It is important that control compartments,
burners and circulating air passageways of the
appliance be kept clean.
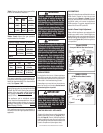
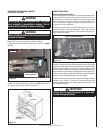
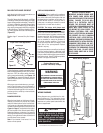
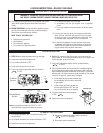
CONTROL COMPARTMENT ACCESS
Pull down hinged door to access control
compartment
(see Figure 3).
Control Compartment Access
Pull down hinged door to access control compartment
Pull down lower
louver (hinged)
Side View of Insert
Figure 3
If your millivolt appliance is equipped with an
optional wall thermostat kit or remote control
kit and the pilot is lit (and valve is in the On
position), the appliance main burner may be
turned on and off with the wall thermostat
or remote control.
Always keep the appliance area clear and
free from combustible materials, gasoline
and other fl ammable liquids.
Remember, millivolt appliances have a
continuous burning pilot fl ame. Exercise
caution when using products with combus-
tible vapors.
WARNING
Children and adults should be
alerted to the hazards of high
surface temperatures. Use cau-
tion around the appliance to
avoid burns or clothing ignition.
Young children should be carefully
supervised when they are in the
same room as the appliance.
Do not attempt to touch the front
enclosure glass with your hands
while the fi replace is in use.
Note: An Optional Screen Panel for
the glass is available (see Page
12 for ordering information).
WARNING
Do not place clothing or other
fl ammable materials on or near
this appliance.
AVERTISSEMENT
Surveiller les enfants. Garder les
vêtements, les meubles, l'essence
ou autres liquides à vapeur infl am-
mables loin de l'appareil.
WARNING
Do not use these appliances if
any part has been under water.
Immediately call a qualifi ed,
professional service technician
to inspect the appliances and to
replace any parts of the control
system and any gas controls
which have been under water.
AVERTISSEMENT
Ne pas se servir de cet appareil
s'il a été plongé dans l'eau,
complètement ou en partie.
Appeler un technicien qualifi é
pour inspecter l'appareil et rem-
placer toute partie du système de
contrôle et toute commande qui
ont été plongés dans l'leau.
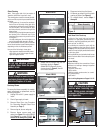
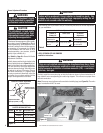
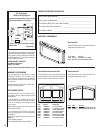
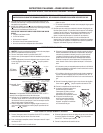
Figure 4
Burner Off/on Switch and Rheostat Location
If optional surround is installed
Burner Off/On
Switch
Rheostat
(blower
speed
control)
Left Front
surround
Panel
Units with Beveled Surround
Units with Flat Surround
Left Front
surround
Panel
Rheostat
(blower
speed
control)
Burner Off/on
Switch
CAUTION
Wear gloves and safety glasses
for protection while doing
required maintenance
.
IMPORTANT
Always verify proper operation
after servicing.
WARNING
Turn off gas and electrical power
before servicing the appliance.
OPERATION AND CARE OF YOUR
APPLIANCE
Appliance operation may be controlled
through a remotely located optional wall
thermostat or remote control.
In lieu of remote control or remote wall thermo-
stat operation, the appliance must be operated
directly through the off/on switch located on the
side surround panel (see Figure 4).
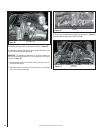
Check Burner Flame Appearance
Visually check the fl ame of the burner periodi-
cally making sure the fl ames are steady and not
lifting or fl oating (see Figure 13 on Page 7).