


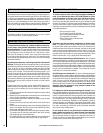

6
NOTE: DIAGRAMS & ILLUSTRATIONS ARE NOT TO SCALE.
Canyon™ C310
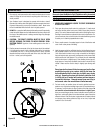
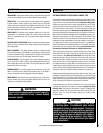
CAUTION: Wear gloves during brick installation in case of sharp
edges behind the stove.
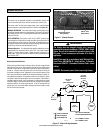
Note: Installation of the baffle boards and baffle blankets are easier when
you can still access the flue outlet, (before connecting the flue vent). Be
sure the baffle blankets are placed flat on the baffle boards so as not
to block exhaust flow to the flue.
Use a ruler or a piece of kindling to
reach over the baffle blanket to be sure it is completely flat on top of the
baffle boards.
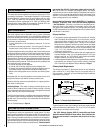
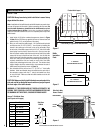
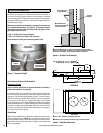
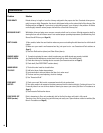
1. Install bricks #1-34 in the numbered sequence as shown in Figure
2 (Note: Bricks 22-25 lean up against the lower air channel and butt
against bricks 17-21 on the bottom of the stove).
2. Next, you will install the baffle boards. All 4 baffle boards included
are the same size (15-1/2” X 6-3/16”). You will start by installing the
boards in the center part of the unit on top of the secondary tubes
to each side of the baffle support with the 15-1/2” side of the baffle
board going from the front to back of the unit. Once you have the
first two boards installed slide the board to the left side of the baffle
support all the way to the left and rear of the unit. You will slide the
board to the right side of the secondary support to the right and rear
of the unit. Next you will install the two remaining boards where you
originally installed the first two boards on each side of the baffle
support and pushed against the rear of the unit. The stainless steel
support hanger should be centered left to right between the sets of
baffle boards and placed as shown in Figure 4.
3. Also included with the unit are two 17” x 12-7/16” x 1” thick baffle
blankets. Install each blanket above the baffle board to each side of
the secondary support with the 17” side of the blanket from front
to rear of the unit. Make sure that the baffle blankets are to the full
rear of the unit.
CAUTION: Make sure that the baffle blankets are centered side to
side and rest flat on the baffle boards and do not project beyond
the front edge of the baffle boards.
WARNING: IF THE BRICKS ARE NOT INSTALLED EXACTLY AS
SHOWN, THEY COULD FALL OUT OF PLACE DURING REFUELING
OR BURNING OF THE STOVE, CAUSING SERIOUS INJURY.
Canyon™ C310 Brick Sizes
(see Figures on this page)
Side View
M Brick
M
2-1/2”
1/2”
4-1/2”
Figure 2
BRICK INSTALLATION
Brick Sizes
A 3-7/8” X 8-3/4”
B 6-1/2” X 4-1/2”
C 3-1/2” X 9”
D 1-1/2” X 4-1/2”
E 3-7/8” X 9”
F 4-1/2” X 9”
H 3-1/2” X 4-1/2”
K 3” X 7”
M 4-1/2” X 4-1/2”
26
B
27
B
28
M
29
B
30
B
1
F
2
F
3
F
4
F
5
F
6
F
*
7
F
8
F
9
E
31
A
32
A*
34
A
33
A*
10
F
*
11
F
12
F
13
E
14
F
15
F
16
F
17
F
18
F
19
C
20
H
21
C
24 D 22 F 23 F 25 D
* These bricks go up against the stoves back wall
Firebox Brick Layout
Firebox
Brick
Baffle Blankets
Baffle
Board
1” Thickness
Two Baffle Blankets Per Unit
1/2” Thickness
Four Baffle Boards Per Unit
17”
12-7/16”
15-1/2”
6-3/16”
Figure 3
Figure 4
Side Cut-A-Way
View of Firebox
Baffle
Insulation
Parts