


Section L- Installation Instructions (continued..)
A stove top connector section may be required with reduced clearances installations
(double-wall connector). WARNING: Never pass a chimney connector through an
attic or roof space, closet or similar concealed space, or a floor or ceiling. Where
passage through a wall or partition of combustible construction is desired, the
installation shall conform to CAN/CSA-B365. DO NOT CONNECT TO ANY AIR
DISTRIBUTION OR DUCT SYSTEM.
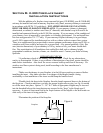
*Chimney- This room heater must be connected to either an 8” chimney
complying with the requirements for Type HT chimneys in the standard for Chimneys,
Factory-Built, Residential Type and Building Heating Appliance, UL HT 103, or a code
approved masonry chimney with a flue liner. (See figure 5 for list of parts).
*CLEARANCES- Refer to Section ‘O’ figures 2 and 3 for minimum
installation clearances to combustibles. NOTE: Clearances
may only be reduced by means approved by the regulatory
authority.
INSTALLATION INSTRUCTIONS:
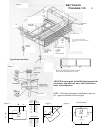
1) Set the unit on the floor protector.
2) Make sure the clearance from the unit to combustibles is according to the
minimum clearances in figures 2 and 3. Also make sure of the minimum
clearances from the chimney connector to combustibles.
3) Check the minimum clearances on the floor protector as per figure 4.
4) Connect the unit to the chimney with the chimney connector (stovepipe) using
a slip connector usually supplied in a basic stovepipe kit.
5) Fasten the stove pipe sections together securely with screws, and screw the
stovepipe to chimney connection at ceiling or wall.
6) Double check all clearances and connections before operation.
*DO NOT CONNECT THIS APPLIANCE TO A CHIMNEY
SERVING ANOTHER APPLIANCE*
*THIS STOVE IS NOT APPROVED FOR
INSTALLATION INTO MOBILE HOMES*
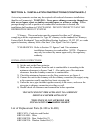
List of Replacement Parts (K-300 or K-400)
KRP-CATS- Catalytics and Gasket
KRP-GLASS1- Glass
KRP-GSKT58- Door Gasket Kit (5’)
KRP-GSKT34- Window Gasket Kit (5’)
7