


3
Installation Instructions...
• As with all metal objects, follow proper handling techniques.
• Freight handling and job site exposure may have damaged
the sink. This sink should be examined for damage prior to
enclosure/installation. Do not install a damaged sink. Return
the sink to the dealer from whom you purchased it. Failure
to do so will void the warranty.
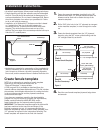
• Installation of all KitchenAid™ Undermount sinks is based
on “sandwiching” the rim of the sink between the
countertop and 1/2” plywood reinforcement sheet (sink
support). The reinforcement sheet rests on top of the
cabinet. The front edge of the countertop must be built-up to
hide this 1/2” underlayment.
Sink
Cabinet
supports
Cabinet
front
Countertop
Sink rim
1/2” reinforcement
sheet
• Aesthetics are essential to presentation of the installed sink.
Take the necessary care to ensure that the exposed silicone
joint is kept to a minimum, the sink is properly aligned to
the cut-out, and the excess silicone is cleaned from the sink.
Create female template
NOTE: As an alternative to creating a female template
according to the instructions shown here, an
“ElectronicTemplate” is also available.
A CNC program file is available to download from the
internet address: http//www.kitchenaid.com/.This file includes
the necessary sink template dimensions for cutting the holes
in the countertop material and the plywood countertop
reinforcement sub-layer.
If you have any questions regarding the downloadable
program file, the file format, or program file requirements,
please contact KitchenAid at 800-422-1230, and/or
www.kitchenaid.com for frequently asked questions.
IMPORTANT: The Masonite template supplied by KitchenAid
has been machined to the exact size and shape of the
finished countertop cut-out. It is recommended that the
Masonite template be used to create a female template from
1/2” plywood as outlined in the instructions following. The
female template will determine the final sink location.
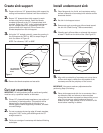
1.
Fasten the masonite template (provided) to the 1/2”
plywood sheet with 1/2” Phillips flathead screws. The
screws must be flush with or below the top of the
masonite template.
2.
Drill a 5/16” pilot hole in the 1/2” plywood at a tangent
to the masonite template, in order to begin the router
cut.
3.
Create the female template from the 1/2” plywood
sheet by using the 3/8” router guide bushing and the
1/4” straight cutter bit, as shown.
1/8” Masonite
3/16”
3/8” O.D. collar
(router guide bushing)
1/2” plywood
cut-out scrap
1/4” straight cutter bit
1-3/16” O.D. collar
(router guide bushing)
1/2” plywood
female template
1/2” straight cutter bit
cut-out scrap
countertop
19/32”
1/4”
Figure 1
Part A
Create Female Template
Part B
Cut Out Countertop
4.
Sand the new female template (plywood) edge clean
and smooth.