


2
Installation requirements...
Parts supplied:
• sink
• sink template (Masonite)
• Installation Instructions/Use and Care Guide
Additional Resources available:
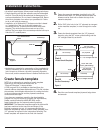
CNC program download - sink template/cut-out dimensions
(see “Create Template”section).
Plumbing requirements
Sink should be plumbed to local plumbing codes.
All plumbing connections should be made by licensed,
qualified plumbers.
Countertop requirements
This undermount sink is intended to be installed with solid
surfaces only.
These instructions are intended for use by qualified
fabricators and installers only.
Tools and Parts:
Assemble the required tools and parts before starting
installation. Read and follow the instructions provided with
any tools listed here.
To ols needed:
• drill
• 5/16” drill bit
• clamps
• 4, 1/2" Phillips flathead
screws
• dust mask
• tape measure
• solvent, such as denatured
alcohol
Parts and Materials needed:
• 1/2" plywood sheets
• faucet with check valve and accompanying plumbing
supplies as needed.
• strainer basket
*Silicone caulk/sealant must meet the qualifications of
ASTM C920, FDA regulation no. 21, CFR 177.2600, NSF-51,
Dow Corning
®
786 is recommended.
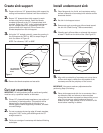
The KitchenAid™ Undermount System is based on installing
Undermount Series sinks, including the plywood
reinforcement sheet (sink support), with the countertop at the
fabricator’s shop.
• silicone sealant*
• router
• 3/8" router guide bushing
• 1-3/16" router guide
bushing
• 1/4” straight cutter bit
• 1/2” straight cutter bit
• #2 Phillips screwdriver
Check local codes. All plumbing connections should be made
by a licensed, qualified plumber.
Installation must be performed by a qualified fabricator/
installer. The sink installation must comply with national and
local plumbing codes and ordinances.
If more holes are required in the sink deck, the holes must be
added by a qualified plumber according to the faucet
manufacturer’s specifications.