


3
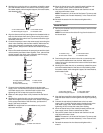
3. Working from under the sink or countertop, reinstall the parts
onto the threaded shank of the faucet in the following order:
flat rubber washer, white triangular support, flat metal washer,
and threaded collar.
4. Align the faucet and firmly hand-tighten the threaded collar to
keep the faucet base from turning when moving the control
lever. Make sure the control lever is pointed toward the right-
hand side of the sink.
5. Connect the sprayer hose to the water supply hose using the
check valve assembly and the fiber washers. Make sure the
check valve assembly is positioned so that the arrow is
pointing down, away from the faucet and toward the sprayer
head.
6. Place a fiber washer between the sprayer hose and the check
valve assembly and fasten them together. Then, place a fiber
washer between the check valve assembly and the supply
hose and fasten them together, as shown.
7. Connect the red-striped, braided hose to the hot water
supply valve. Connect the blue-striped, braided hose to the
cold water supply valve. Hold the hoses in place when
tightening the nut to keep the hoses from twisting.
8. Make sure the sprayer hose is fully inserted into the faucet
body.
9. Working from under the sink, use the screws provided to
attach the weights onto the sprayer hose. Attach the weights
to the sprayer head side of the hose loop, just above the
bend in the hose, as shown.
NOTE: The weights are for counterbalance only, not for
automatic retraction.
10. Move the faucet lever to the closed (forward) position and
open supply valves. Check connections for leaks.
11. Remove the aerator from the faucet and flush the hot and
cold lines until water is clear.
NOTE: The aerator is in the end of the faucet. To remove and
replace aerator, see “Aerator Assembly” in the “Faucet Care”
section.
12. Reinstall the aerator into the faucet and tighten with a
wrench.
Model KKFV01LP
1. Remove the threaded collar, flat metal washer, and flat rubber
washer from faucet.
NOTE: Do not remove the rubber O-ring from the bottom of
the faucet base.
2. Feed tubing through the hole in the sink or counter top and
then insert threaded shank into the hole. Make sure the
rubber O-ring in the channel at the bottom of the faucet base
is firmly in place.
3. Working from under the sink or countertop, reinstall the parts
onto the threaded shank of the faucet in the following order:
flat rubber washer, white triangular support, flat metal washer,
and threaded collar.
4. Align the faucet and firmly hand-tighten the threaded collar to
keep the faucet base from turning when moving the operating
lever.
5. Connect the red-striped, braided hose to the hot water
supply valve. Connect the blue-striped, braided hose to the
cold water supply valve. Hold the hoses in place when
tightening the nut to keep the hoses from twisting.
6. Move the faucet lever to the closed (forward) position and
open supply valves. Check connections for leaks.
7. Remove the aerator from the faucet and flush the hot and
cold lines until water is clear.
NOTE: The aerator is in the end of the faucet. To remove and
replace aerator, see “Aerator Assembly” in the “Faucet Care”
section.
8. Reinstall the aerator into the faucet and tighten with a
wrench.
A.Flat rubber washer
B. White triangular support
C. Flat metal washer
D. Threaded collar
A. Supply hose (from faucet)
B. Fiber washer
C. Check valve assembly
D. Fiber washer
E. Sprayer hose
A. Weights
B. Sprayer hose
C. Water flow direction
A
B
C
D
A
B
C
D
E
A
B
C
A. Rubber O-ring
B. Flat rubber washer
C. Flat metal washer
D. Threaded collar
A.Flat rubber washer
B.White triangular support
C. Flat metal washer
D.Threaded collar
A
B
C
D
A
B
C
D