


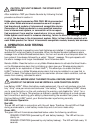

3. Select one of the units. You will define the ID of your system by positioning the switch-
es of the dipswitch in a random pattern. The ID will need to be the same for each Kidde
Wireless device This ID will differentiate your alarm system from similar systems nearby.
Do not use the ID your units are shipped with.
4. Using a pen or pencil, change the switches in each of the Kidde Wireless devices to
match the pattern you selected in step 3. Be careful to not get the sequence back-
wards.
5. Power each unit after setting the ID by installing the batteries. The devices only read the
ID that has been set when they are first powered. Any changes to the switches after the
unit is powered will not be recognized, and will require the power to be removed for a
minimum of 30 seconds before applying power again.
6. Push and hold the test button on each unit for at least 5 seconds, or until all devices
produce an alarm. If all units do not produce an alarm, refer to the trouble-shooting
section at the end of this user’s guide.
CAUTION: Due to the loudness of the device, always stand an arm’s length
away from the unit when testing.
7. Install the device in accordance with the user’s guide and repeat step 6. Since wireless
communication can be interrupted by a number of factors, you must test your alarms
system weekly to ensure proper communication between all units.
8. Read the user’s guide and keep it in a safe place for future reference.
If your Wireless smoke alarms and accessories enter alarm mode, first check to see
if there is a fire. If a fire does not exist, and the test buttons have not been activat-
ed on any of the units, it is likely that you are receiving interference from a similar
system nearby. In this case, repeat the above steps and select a different dipswitch
pattern, making sure to disconnect power and remove the batteries before chang-
ing the switch positions.
BATTERY INSTALLATION
CAUTION! THIS UNIT WILL NOT FUNCTION PROPERLY WITHOUT A FRESH
BATTERY INSTALLED CORRECTLY. THIS DEVICE WILL QUICKLY DEPLETE
BATTERIES WHILE ON BATTERY BACK-UP. CONNECT THE UNIT TO AC POWER
IMMEDIATELY AFTER INSTALLING THE BATTERIES.
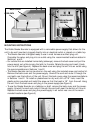
Remove the back cover from the unit by prying it up at the bottom in the center. If you are set-
ting the unit up for the first time, set the Wireless ID as described previously before connecting
the battery. Connect the battery to the terminals in the back of the unit and place it in the bat-
tery compartment. Replace the back cover of the unit and place the unit in its chosen location.
WIRING REQUIREMENTS
• The appropriate power source is 120 Volt A.C. Single Phase outlet supplied from a non-
switchable circuit that is not protected by a ground fault interrupter.
WARNING: The Smoke Sounder cannot be operated on power derived from a
square wave or modified square wave inverter. These types of inverters are
sometimes used to supply power to the structure in off grid installations,
such as solar or wind derived power sources. These power sources produce
high peak voltages that will damage the device.