


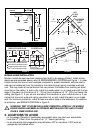
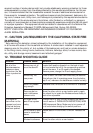
4. Drill a hole through the pencil marks and use the enclosed screws and anchors to secure
the mounting plate (use 3/16”drill bit for anchor holes).
5. Install the alarm on the mounting bracket and rotate the alarm clockwise until the alarm
ratchets into place (this ratcheting function allows for aesthetic alignment). NOTE: The
alarm will mount to the bracket in 4 positions (every 90 degrees).
6. The green LED should blink once every 10 seconds.
7. Test the unit to ensure proper operation by pressing the Test Button. All interconnected
alarms should respond.
CAUTION: Due to the loudness of the alarm, always stand an arm’s length
away from the unit when testing.
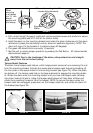
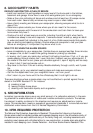
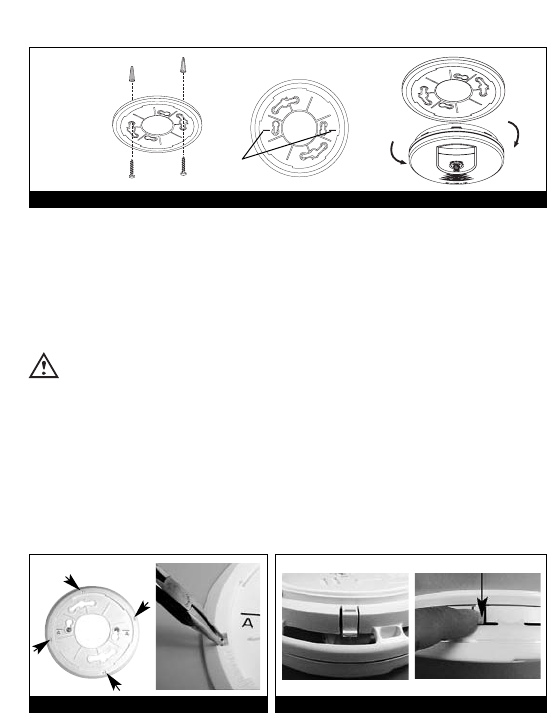
Tamper Resist Features
This alarm has a tamper resist feature, which helps prevent someone from removing the unit
from the mounting bracket. Activate the smoke alarm tamper resist feature by breaking off
the four posts in the square holes in the mounting bracket (see Figure 7A). When the posts
are broken off, the tamper resist tab on the base is allowed to engage the mounting brack-
et. Rotate the alarm onto the mounting bracket until you hear the tamper resist tab snap
into place, locking the alarm. Using the tamper resist feature will help deter children and
others from removing the alarm from the bracket. NOTE: To remove the alarm when the
tamper resist tab is engaged, press down on the tamper resist tab, and rotate the alarm off
the bracket (see Figure 7B).
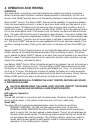
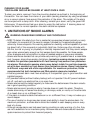
FIGURE 6
A A
Remove
When
mounting
in a hallway,
the “A” line
should
parallel with
the hallway.
When wall mounting, the “A”
line should be horizontal.
Alignment
Marks
Install
FIGURE 7A FIGURE 7B
Locations of Posts