


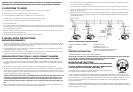

WHEN UNITS ARE INTERCONNECTED, only the red LED of the alarm which senses the smoke or is
being tested (the originating unit) will flash rapidly. All other units in the interconnect system will sound
an alarm but their red LED’s will NOT flash rapidly.
The green LED has two modes of operation.
Standby Condition The green LED will be steady on, indicating the presence of AC power.
Alarm Condition This smoke alarm is equipped with an alarm memory which provides a
visual indication when an alarm has been activated. A flashing green LED
indicates the memory condition. The memory will remain activated until it is
reset by pushing the test button.
In an interconnected installation only the memory of the originating alarm will be activated.
TESTING: Test by pushing the test button on the cover and hold it down for a minimum of 2 seconds.
This will sound the alarm if all the electronic circuitry, horn and battery are working. If no alarm sounds,
check the fuse or circuit breaker supplying power to the alarm circuit. If the alarm still does not sound,
the unit has defective batteries or other failure. DONOT use an open flame to test your alarm, you
could damage the alarm or ignite combustible materials and start a structure fire.
TEST THE ALARM WEEKLY TO ENSURE PROPER OPERATION. Erratic or low sound coming from
your alarm may indicate a defective alarm, and it should be returned for service (see Section 12).
5. NUISANCE ALARMS
Smoke alarms are designed to minimize nuisance alarms. Cigarette smoke will not normally set off the
alarm, unless the smoke is blown directly into the alarm. Combustion particles from cooking may set
off the alarm if the alarm is located close to the cooking area. Large quantities of combustible particles
are generated from spills or when broiling. Using the fan on a range hood which vents to the outside
(non-recirculating type) will also help remove these combustible products from the kitchen.
Model 1276 has a “HUSH” button that is extremely useful in a kitchen area or other areas prone to nui-
sance alarms. For more information, refer to Section 4 OPERATION AND TESTING.
If the alarm does sound, check for fires first. If a fire is discovered, get out and call the fire department.
If no fire is present, check to see if one of the reasons listed in Section 2 may have caused the alarm.
6. MAINTENANCE
ALARM REMOVAL
IF SMOKE ALARM TAMPER RESIST FEATURE HAS BEEN ACTIVATED, REFER TO SMOKE
ALARM TAMPER RESIST FEATURE IN SECTION 3 FOR REMOVAL INSTRUCTIONS.
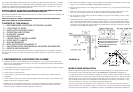
To remove the alarm from the trim ring, rotate the alarm counter clockwise in the direction of the "OFF"
arrow on the cover. To disconnect the A.C. power harness, squeeze the locking arms on the sides of
the Quick Connector while pulling the connector away from the bottom of the alarm (see Section 3,
Figure 3)
BATTERY INSTALLATION AND REMOVAL
Note: If battery carrier tamper resist feature has been activated it will need to be deactivate in order to
change the battery. Refer to section 3 “Battery Carrier Tamper Resist Feature” for instructions.
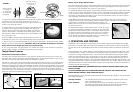
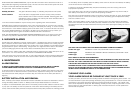
To replace or install the batteries press down on the battery carrier and then release to allow the carrier
to pop open. The battery can then be pulled out of the carrier. When installing a new battery into the
carrier, make sure the battery terminals are exposed and that the polarity matches the markings printed
on the battery carrier. Completely press the battery carrier down into the alarm and release, the battery
carrier will lock into the closed position.
A missing or improperly installed battery will prevent the battery carrier from closing and result in
improper alarm operation.
This smoke alarm uses a 9V carbon zinc battery (alkaline and lithium batteries may also be used). A
fresh battery should last for one year under normal operating conditions.
This alarm has a low/missing battery monitor circuit which will cause the alarm to “chirp” approximately
every 30-40 seconds for a minimum of seven (7) days when the battery gets low.Replace the battery
when this condition occurs.
NOTE: Low/missing battery monitor circuit WILL cause the unit to chirp while replacing the battery.
This function will cease once the new battery has been installed. To avoid this “chirp” the unit can be
removed from the base and disconnected from the AC power when replacing the battery, but it is not
necessary.
USE ONLY THE FOLLOWING 9 VOLT BATTERIES FOR SMOKE ALARM REPLACEMENT.
Carbon-zinc type EVEREADY 216 OR 1222; GOLD PEAK 1604P OR 1604S
Alkaline type EVEREADY 522; DURACELL MN1604 OR MX1604; GOLD PEAK 1604A
Lithium type ULTRALIFE U9VL
NOTE: REGULAR TESTING IS RECOMMENDED!
NOTE: IF AFTER BATTERY REPLACEMENT THE ALARM CONTINUES TO CHIRP, PUSH THE TEST
BUTTON. THE “HUSH” FEATURE MAY HAVE BEEN ACTIVATED ACCIDENTLY WHILE CHANGING
THE BATTERY AND PUSHING THE TEST BUTTON WILL END THE HUSH CYCLE.
WARNING! BE SURE TO FOLLOW BATTERY INSTALLATION INSTRUCTIONS PRINTED ON THE
BACK OF THE ALARM AND USE ONLY THE BATTERIES SPECIFIED. USE OF DIFFERENT BATTER-
IES MAY HAVE A DETRIMENTAL EFFECT ON THE SMOKE ALARM.
CLEANING YOUR ALARM.
YOUR ALARM SHOULD BE CLEANED AT LEAST ONCE A YEAR
To clean your alarm, remove it from the mounting bracket as outlined in the beginning of this section. You
can clean the interior of your alarm (sensing chamber) by using compressed air or a vacuum cleaner hose
and blowing or vacuuming through the openings around the perimeter of the alarm. The outside of the
alarm can be wiped with a damp cloth. After cleaning, reinstall your alarm, verify the green LED is on and
test your alarm by using the test button. If cleaning does not restore the alarm to normal operation the
alarm should be replaced.
PRESS OPEN INSERT