


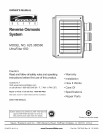

CHOOSE TYPE OF WATER FITTING TO
INSTALL
Locate the cold water line in the sink cabinet. It is recom-
mended, but not required, that the cold water line be soft
water. You can use the saddle valve provided with your
unit to tap into the cold water line. See Fig. 5. Or you can
purchase standard pipe fittings locally such as a com-
pression fitting. The fitting must provide a leak-tight
connection to the Reverse Osmosis 1/4" tube.
NOTE: Local code may dictate which type of water fit-
ting is used. Consult a plumber if you are not familiar
with local codes or plumbing procedures.
NOTE: Codes in the state of Massachusetts require
installation by a licensed plumber and do not permit the
use of saddle valves.
If you live in the state of Massachusetts, review plumb-
ing code 248-CMR of the Commonwealth of
Massachusetts before proceeding with the installation.
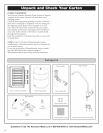
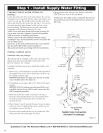
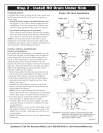
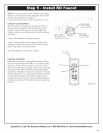
INSTALL SADDLE VALVE
(Included with your package)
This fitting will be installed on the cold water pipe. The
fitting must provide a leak-tight connection to the
Reverse Osmosis 1/4" tubing.
Complete the following steps to install the saddle valve
assembly.
.
Review Fig. 5 and familiarize yourself with all parts of
the saddle valve. This valve will self-tap a hole in cop-
per tubing or plastic pipe.
IMPORTANT'. Before starting, close the hot and cold
water shutoff valves (See Figure 5).
2.
if installing on iron pipe, drill a 1/8" hole for the pierc-
ing pin.
IMPORTANT'. if a battery-powered hand drill is not
available and an electric drill is used, ensure that the
drill is properly grounded.
.
Place the seal on the inside of Clamp X. See Fig. 5.
Turn the valve handle all the way out.(counter-clock-
wise) Be sure the piercing pin does not stick out
beyond the seal.
4. Place Clamp X and Z around the pipe. Secure in place
with two screws. Tighten both screws evenly. Do not
over tighten screws. See Fig. 5.
5. Turn the valve handle all the way in. (clockwise) This
will pierce the wall of the pipe. See Fig. 5.
6. Do not connect the tubing to the fitting at this time.
This will occur later in the installation.
NOTE: Once the saddle valve is installed, the nut near
the handle may need to be tightened to prevent possi-
ble leaks.
\
Hot Water
Shutoff Valve
Cold Water
Shutoff Valve
Clamp Z
Pre-Drill
1/8" Hole
',Iron Pipe)
Seal
_X
Valve
Nut - tighten
if necessary
(Plastic)
Insert
Nut Use to Connect
Tubing
Saddle Valve Connection
(Included in package)
Handle
Figure 5
Questions? Call The Kenmore Water Line 1-800-426-9345 or visit KenmoreWater.com