


INSTALLATION STEPS
STEP 2 - MAKE HOLE FOR FILTERED
WATER FAUCET
Select I of the following places to install the faucet. Be
sure there's room underneath so you can make the
needed connections.
- - In an existing sink spray attachment hole.
- - Drill a hole in the sink top.
- - Drill a hole in the countertop next to the sink.
1. If drilling is needed make a 3/4" dia. (minimum)
hole for the faucet.
CAUTION: To avoid damaging the sink, consult a
qualified plumber or installer for drilling procedures
in porcelain or stainless steel. Special drill bits are
made for this.
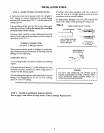
2. Place plumbers putty around the drilled hole to
prevent water leaks around the faucet.
FIG, 3 . 3/4" dia. hole
• r throunh sink nr
,p
plumbers
putty
STEP 3 - ASSEMBLE AND
INSTALL FAUCET
Note: If the faucet is not assembled, slide the lever
over the cylindrical nut. Then push or turn the spout
into the faucet body.
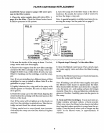
1. Faucet, FIG. 4:
A. If not already assembled, install the rubber wash-
er, spacer, flat (or lock) washer and hex nut onto the
threaded faucet stud.
B. Apply Teflon tape to the end of the faucet stud.
Turn the tubing adapter onto the stud and hand
tighten, then wrench 1/4 turn only. BE CAREFUL
NOT TO CROSS THREAD._
3. Wet the o-ring seals on the faucet spout. Then, re-
move and discard the short piece of tubing from the
faucet body and insert the spout in it's place.
4. Connect tubing to faucet as follows.
5. Lower the faucet into the sink or countertop hole.
6. On the underside of the sink or countertop insert
the large steel washer between the mounting hole
and the spacer on the faucet stud (see assembled
view). Then turn the hex nut up to the spacer and
tighten. Tighten the hex nut so the faucet can not
move, but do not overtighten and break the faucet.
6
FIG, 4
insert spout
remove tub-
ing_piece t I
ASSEMBLED IN
MOUNTING HOLE
faucet & spout
steel washer //
TUBING FROM
DRINKING WATER .....
SYSTEM
hole in sink or
countertop