


9
-- STEP 6: SANITIZING, PRESSURE TESTING & PURGING --
SANITIZING
Sanitizing is recommended upon installation of the
RO system, and after servicing inner parts. It is im-
portant for the service person to have clean hands
while handling inner parts of the system.
CAUTION: Be sure to remove the RO membrane
and both filter cartridges as follows, before sanitiz-
ing. Chlorine will destroy the RO membrane car-
tridge.
1. Be sure the water supply to the RO is turned off,
and the RO faucet is open to relieve pressure.
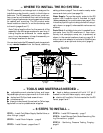
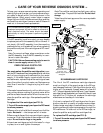
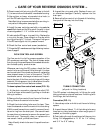
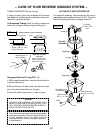
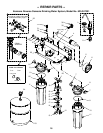
2. Referring to FIG. 9, page 11, press inward while
turning the RO cap to the left (?) to remove from the
bracket/membrane housing. Remove (use pliers)
the RO cartridge from the housing. Place the car-
tridge in a clean plastic bag.
3. Be sure the o-ring seal is in the RO cap. Replace the
RO cap and push inward while turning to the right
(?) to lock.
4. Remove the postfilter sump, turning to the left.
Take the cartridge from the sump and place in the
plastic bag. Replace the sump and tighten securely.
5. Remove the prefilter sump and cartridge. Also
place this cartridge in the clean bag.
6. If needed to clean, flush the prefilter sump with
fresh water. Then, fill with water to about 1” from the
top. Add 1.0 ounce of chlorine (ordinary 5.25%
household bleach ...Hilex, Clorox,etc.)andmixinthe
water. Do not add chlorine first. Concentrated, it
will attack plastics.
7. Carefully replace the sump on the prefilter head
and tighten securely.
8. Slowly open the water supply to the RO.
9. Open the RO faucet, locking the lever upward,
against the spout.
10. Allow water to circulate through the RO system
until you smell the bleach odor. Then close thefaucet
and allow the RO to stand idle for 20 minutes.
11. After the 20 minutes, open the RO faucet and run
water until the bleach odor is gone.
12. Turn off the water supply to the RO.
13. Be sure your hands are clean. Then, repeat steps
1 - 5 and 7, only replace all cartridges.
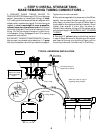
Important: Refer to FIG. 9, page 11, and to page 12
when replacing cartridges. The prefilter (left side)
cartridge has light gray coloring, and the postfilter
(right side) has blue coloring.
PRESSURE TESTING
1. Do the preceding sanitizing procedures before
pressure testing.
2. Open the water supply shutoff valve to the RO.
3. Open the main water supply valve and several
house faucets to purge air from the system. Close
faucets when water runs smooth.
4. In about 2 hours, pressure will start to build in the
ROsystem.Then,carefullycheckallfittingsandcon-
nections for water leaks. Correct leaks if any are
found.
Note: When the system is first pressurized, water
may ‘ ‘spurt’ ’ from the faucet airgap hole until air is
expelled from the RO system.
PURGING RO MEMBRANE
Important purging instructions: The RO cartridge
contains a food grade preservative that you should
clean from it before usingwater fromthe system. The
preservative will give product water an unpleasant
taste and odor.
1. Allow the storage tank to fill for about 4 hours.
Then, open the RO faucet until the tank is empty and
flow stops.
2. Close the RO faucet and allow the tank to fill again
for 4 hours. Then, open the RO faucet and empty
again.
Repeat steps 1 and 2 to purge the storage tank 4 times. Then, the RO system is ready to
make product water for use.