


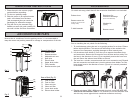
UNPACKING INSTRUCTIONS
AIR CONDITIONER PARTS
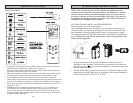
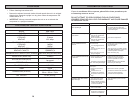
ACCESSORIES
On initial unit setup, check that all the accessories listed below are included:
Exhaust hose
Remote sensor kit
(used only in out-of-room
cooling mode)
2 AAA batteries
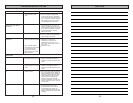
INSTALLATION
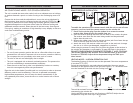
Prior to installing the unit, check for the following:
1. To avoid damage, place the unit in an upright position for at least 12 hours
before initial operation. This ensures all lubricating oil has settled to the
bottom of the compressor, avoiding damage to other internal parts.
2. Lift the exhaust hose holder (1) from the unit to expose the exhaust hose
and accessories. Remove the accessories from the hose and set aside. Turn
the hose in the direction of arrow (2) to completely remove the hose from
the unit. Return the exhaust hose holder to the unit.
3. The hose has a window connection end and a unit connection end. Expand
the unit connection end and insert it into the exhaust hose holder. Turn the
hose several turns in the direction of arrow (3) until it is securely attached
in the holder.
4. Plug the unit into a 120V~60Hz grounded electrical outlet. DO NOT USE
A REGULAR EXTENSION CORD. If it is necessary to use an extension cord
with this unit, use an approved air conditioner extension cord only.
8 9
Remove the air conditioner from the packing carton. It is recommended to
keep the carton and packing material for storage or transportation of the unit.
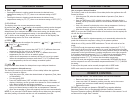
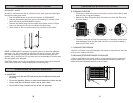
Front of Unit (Fig. 1)
1. Control Panel
2. Remote receiver
3. Adjustable air vent
4. Hose joint
5. Exhaust hose
6. Upper drain outlet
7. Carry handles
8. Remote receiver jack
Rear of Unit (Fig. 2)
9. Cool air inlet
10. Cool air lter
11. Warm air inlet
12. Warm air lter
13. Lower drain outlet
14. Exhaust hose holder
Fig. 1
Fig. 2
Drain hose for
continuous drainage
(16 mm inner diameter)
Window kit
(3 pcs)
Remote control
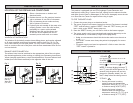
1. Place the unit in the correct upright
position before unpacking.
2. Cut the two packing straps.
3. Slide the carton in an upward motion
and it will release from the base.
(We recommend that you retain the
packaging for oseason storage)
4. Grip the unit by the recessed carry
handles on each side, and carefully lift
unit until it slides free from foam base.
(
1
)
(
2
)
(
3
)
(
4
)
(
5
)
(
6
)
(
7
)
(
8
)
(
9
)
(
14
)
(
10
)
(
11
)
(
12
)
(
13
)
C
o
o
F
(
1
)
(
2
) (
3
)
Carry
Handles