


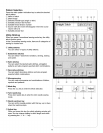
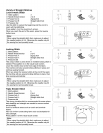
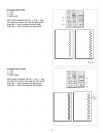

Variety of Straight Stitches
Lock-a-matic Stitch
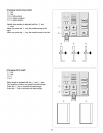
Stitch pattern: 3
Needle thread tension 2 to 6
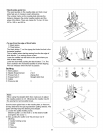
Presser foot A: Zigzag foot
Presser foot H: Straight stitch foot
Pressure dial 3
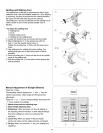
Use this stitch to secure the beginning and the end of a
seam with backstitching.
Press pattern 3 on the visual touch screen.
When you reach the end of the seam, press the reverse
button once.
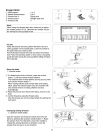
Note:
When using the straight stitch foot, make sure to adjust
the needle position to 3.5. Otherwise the needle may hit
the sewing foot and possibly break.
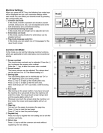
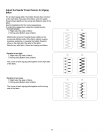
Locking Stitch
Stitch pattern: 4
Needle thread tension 2 to 6
Presser foot A: Zigzag foot
Presser foot H: Straight stitch foot
Pressure dial 3
This unique stitch is used where an invisible locking stitch is
needed. Press pattern 4 on the visual touch screen.
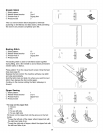
Lower the needle close to the front edge of the fabric.
The machine wilt sew several locking stitches in place and
continue sewing forward.
When you press the reverse button at the end of the seam,
the machine will sew several locking stitches in place, then
stop sewing automatically.
Note:
When using the straight stitch foot, make sure to adjust
the needle position to 3.5. Otherwise the needle may hit
the sewing foot and possibly break.
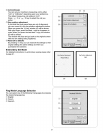
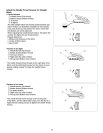
Triple Stretch Stitch
Stitch pattern: 5
Needle thread tension 2 to 6
Presser foot A: Zigzag foot
Presser foot H: Straight stitch foot
Pressure dial 3
This strong, durable stitch is recommended for areas where
both elasticity and strength are needed to ensure comfort
and durability.
Use it to reinforce areas such as crotch and armhole
seams.
Also use it when constructing items such as backpacks for
extra strength.
Press pattern 5 on the visual touch screen.
Note:
When using the straight stitch foot, make sure to adjust
the needle position to 3.5. Otherwise the needle may hit
the sewing foot and possibly break.
S
®
i
i
i
i
c_
®
®
i
i
i
i
I_l 5¸
i Itl
cltl_
®
®
®
J
J
Y
J
27