


page 5
TOOL ASSEMBLY
WARNING!
To reduce the risk of injury, always unplug vacuum
cleaner before attaching or removing accessories
or making adjustments. Use only specifically
recommended accessories. Others may be
hazardous.
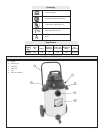
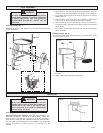
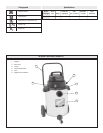
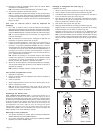
Assembling Dolly (Fig. 1)
Assemble as shown in the diagram. You will need a hammer and a
Phillips screwdriver.
1. Place wheels on rear frame (B) by tapping in the axle (C), fitting the
wheel (D) on the axle and tapping a cap nut (E) on with a hammer.
2. Insert caster socket (G) into front frame (F) and secure it with the
phillips screw (I).
3. Align front frame (F) and rear frame (B) so that they fit together and
fit lip of tank (J) into the grooves in front and rear frames.
4. Secure frame (B and F) to the tank by placing the hex bolts (K)
through the holes in dolly and securing them with nut (N) and washer
(M) as shown.
5. Insert caster (H) into caster socket (G) and push down until caster
snaps into place.
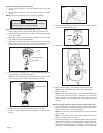
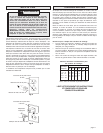
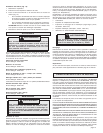
Installing Handle (Fig. 2)
You will need either a flat blade screwdriver or a socket driver and a
wrench or a pair of pliers.
1. Place dolly handle between tank and side handle on either side of
the tank.
2. Fasten tightly with slotted hex head screws.
Fig. 2
Fig. 1
A
E
D
C
G
F
H
I
B
J
L
M
N
K
OPERATION
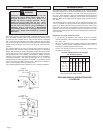
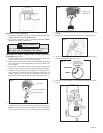
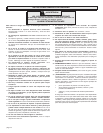
Vacuuming Wet Materials (Fig. 3)
When vacuuming wet materials, either the filter cartridge or the
foam sleeve is required. Remove all dry pick-up filters. A float valve
shuts off suction when the tank is full (Fig. 3). If you are vacuuming a
large amount of liquid, the filter cartridge can become saturated and a
mist can appear from the exhaust port. If this happens, dry the filter by
running the vacuum (without picking up anything) for 10
minutes.
WARNING!
If the float is clean and moves freely and the
suction does not shut off when tank is filled (you
will be able to see water in the exhaust port),
send motorhead to the nearest
MILWAUKEE
service facility for repair.
Fig. 3
float
float cage