


4
43553-01 • 05/15/09 • Hunter Fan Company
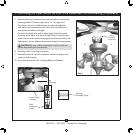
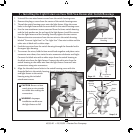
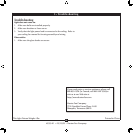
1. Unscrew the three screws from the upper switch housing. Disconnect
the 9-pin plug connectors. Remove the lower switch housing.
2. Push the plug button from inside the lower switch housing to remove
the plug button and switch housing cap.
NOTE: Save the plug button and switch housing cap should you
choose to remove the light xture in the future.
3. Feed the two wires from the light xture through the center hole in
the lower switch housing.
4. Screw the threaded rod of the light xture into the center of the lower
switch housing until you feel resistance. Unscrew the light xture
slightly until the holes of the light xture are aligned with the holes in
the lower switch housing.
5. Finish attaching the light xture to the lower switch housing using the
two attachment screws included. Securely tighten the two screws.
6. Install the nut and washer inside the lower switch housing onto the
threaded rod from the upper light housing.
Removable Switch Housing
9-Pin Plug
Connector
Lower Switch
Housing
Plug Button
Screw
Steps 1-2
Lower
Switch
Housing
Light
Fixture
WARNING: Improper installation could
cause the light xture to fall, or result in
electrical shock or personal injury.
Steps 3-6
Washer
Nut
Attachment
Screws
Threaded
Rod
1 • Installing the Light fixture on Fans With Removable Switch Housings