


©2010 Hunter Fan Co. 43057-01 20100609
5
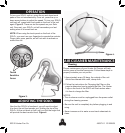
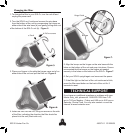
5. Align the bumps on the hinges on the wire base with the
holes on the bottom of the unit and snap into place. Ensure
once seated that the bumps on the hinges are seated
securely in the holes on the bottom of the SOLO
2
.
Figure 7.
6. Set your SOLO
2
upright again and reconnect the power.
7. If the filter light on the front of the unit continues to blink,
press the filter reset button on the back of the unit for 3
seconds to reset.
4. Install the filter into the unit, using the arrows on the side
of the filter, indicating the direction the filter should be
placed into the unit (black side out).
Figure 6.
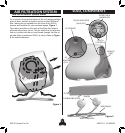
3. Place your fingers in the slots the hinges came out of on
either side of the unit and pull the filter out. Figure 6.
Changing the Filter
1. To change the filter in your SOLO
2
, turn the unit off and
unplug the power cord.
2. Turn the SOLO
2
on it’s side and remove the wire base
from the bottom of the unit by compressing the hinges on
either side of the wire base (a) and gently pulling each out
of the bottom of the SOLO
2
unit (b) . Figure 5.
Figure 5.
a. Pinch
b. Pull to remove
TECHNICAL SUPPORT
If you have any additional questions or problems with your
Hunter Solo
2
unit, please call 1-888-830-1326 from 7:00
am to 7:00 pm Monday - Friday and 8:00 am to 5:00 pm on
Saturday, Central Time. You may also contact us over the
Internet at www.hunterfan.com.
Bumps
Figure 7.
Hinge Guide