


10
ELECTRICAL INSTALLATION
1. Enter the electrical service entrance with properly sized feeder leads, conforming to the
voltage stamped on the rating plate. Note: A separate fused branch circuit, conforming to
local or National Electric Codes, must be provided by a qualified electrician.
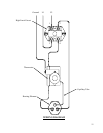
2. Connect these power leads to wires enclosed in junction box with wire nuts. Refer to wiring
diagram.
CAUTION: There is a risk of electric shock in an ungrounded service. It is critical that this
unit be wired with a power supply that has a service ground wire available. Be sure to
connect the ground wire to the green ground wire provided in the junction box.
3. Mark the electrical shut off clearly for future emergency use.
4. Field connections with aluminum conductors must use connectors approved for copper to
aluminum connection.
5. All other electrical connections are made at the factory; therefore, no other electrical
connections are necessary.
FINAL CHECKS
1. Check all connections for tightness.
2. Complete following checklist to ensure that all the above steps are completed:
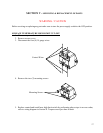
a. Unit unpacked and checked for damage.
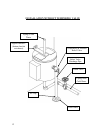
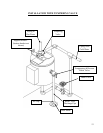
b. Heater properly located.
c. Heater properly secured to wall.
d. Cold water line connected to cold water inlet on tank.
e.
Shut-off valve installed on cold water line.
f. Hot water line connected to hot water outlet on tank.
g.
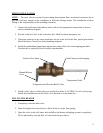
Temperature and pressure relief valve installed.
h. Relief valve overflow line installed.
i.
Water heater filled with water.
j. Power leads connected inside electrical enclosure from separate fused circuit.
k.
Ground wire connected.
3. After the water is heated for the first time, monitor the water temperature as described in
Section III, Quarterly Inspection.