


4
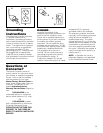
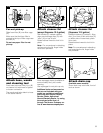
Carton contents
Remove parts from tank and
identify the following:
A.Cleaner tank
B.Cleaner lid and motor housing
or cleaner lid and motor hous
ing (Supreme 12.5 gallon)
C.Hose
D.Caster supports (4)*
E. Casters(4)
F. Wet/Dry nozzle
G.Squeegee insert *
H.Paper filter
I. Foam filter
J. Mounting ring
K.Extension wands (2)
L. Caster support screws (4)*
*included with some models
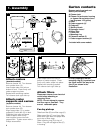
1. Assembly
1-1
1-2
1-3
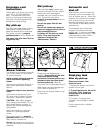
Attach casters
(standard models)
Remove cleaner lid. Turn cleaner
tank upside down (A).
Insert caster stem into hole on
bottom of tank. Press firmly until
caster snaps into place.
Repeat with remaining casters.
Turn cleaner tank right side up.
Attach caster
supports and casters
(supreme models)
Remove cleaner lid. Turn cleaner
tank upside down (B).
Align square tabs (1) on caster
supports (3) with rails (2) on tank.
Slide tabs onto rails and press
caster support down firmly.
Insert support screw into hole
nearest tank. Tighten screw with a
Phillips screwdriver.
Insert caster stem into hole on
bottom of caster support. Press
firmly until caster snaps into place.
Repeat with remaining casters.
Turn cleaner tank right side up.
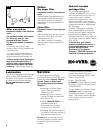
Attach filters
Disconnect cleaner from electrical
outlet before attaching or
removing filters.
NOTE: Do not attempt to remove
the filter cage or float ball. They
are not removable parts.
For dry pick-up
Slide foam filter (B) over filter cage (A).
Slide paper filter (C) over foam filter.
Make sure foam filter and paper filter
are to top of filter cage.
Slide mounting ring (D) to top of
filters. Ring will rest against ribs (E)
in housing.
A B
B
C
D
E
F
G
K
H
I
J
L
B
C
D
E
A
A
B
1
3
2
It is very important that the
mounting ring (D) is pushed over
the filters and all the way to the
ribs (E), as shown in the
illustration.