


Service
To obtain approved HOOVER service and
genuine HOOVER parts, locate the near-
est Hoover Factory Service Center or
Authorized Hoover Warranty Service
Dealer (Depot) by:
• checking the Yellow Pages
under “Vacuum Cleaners -
Household” OR -
• checking the list of Factory
Service Centers provided
with this cleaner OR -
• calling 1-800-944-9200 for an
automated referral of
authorized service outlet
locations (U.S. only) OR -
• checking the Service section of
The Hoover Company on-line at
www.hoover.com
Do not send your cleaner to The Hoover
Company in North Canton for service, this
will only result in delay.
If further assistance is needed, contact
The Hoover Company Consumer
Response Center, North Canton, Ohio
44720 Phone: 1-330-499-9499.
In Canada, contact Hoover Canada,
Burlington, Ontario L7R 4A8,
Phone: 1-800-263-6376.
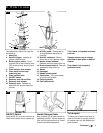
Always identify your cleaner by the com-
plete model number when requesting
information or ordering parts. (The model
number appears at the bottom of the back
of the cleaner body.)
LYSOL® and OLD ENGLISH® are regis-
tered trademarks of Reckitt Benckiser Inc.
Possible cause
Possible solution
• Excess detergent foaming in
tanks
• Use Machine Formula LYSOL®
Floor Cleaning Concentrate or
Machine Formula OLD ENGLISH®
Wood Floor Cleaning Concentrate, it
is a low-foam formulation. If using
detergent other than LYSOL® brand
or OLD ENGLISH® brand, remix
cleaning solution using less deter -
gent.
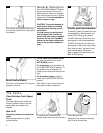
• Solution tank not properly
installed
• Ensure that tank is installed properly
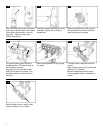
(Fig. 2-15).r
• Recovery tank is full
• Empty tankProblem: Cleaner does
12
Possible cause
Possible solution
• Recovery tank full/automatic
shutoff engaged
• Remove and empty recovery tank.
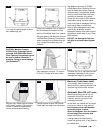
• Filter or filter lid missing or not
positioned correctly
• Ensure that filter and filter lid are
properly positioned in the recovery
tank lid (Fig. 2-22)
• Recovery tank and/or solution
tank not positioned properly
• Ensure that both tanks are locked in
place.
• Filter is dirty
• Clean filter
• Nozzle not properly positioned
• Ensure nozzle is replaced properly
and locked (Figs. 4-8 & 4-9).
If a minor problem occurs, it usually
can be solved quite easily when the
cause is found by using the check list
below.
Problem: Machine won’t run
Possible cause
Possible solution
• Not firmly plugged in
• Plug unit in firmly.
• No voltage in wall plug
• Check fuse or breaker.
• Blown fuse/tripped breaker
• Replace fuse/reset breaker.
5. If you have a
problem
Problem: Low suction
Problem: Water puddling behind
cleaner
Problem: Cleaner does not pick up
dirty solution
Possible cause
Possible solution
• Cleaner not set for wet operation
• Press wet/dry pedal to “WET” posi -
tion.
• Recovery tank not properly
installed
• Ensure that recovery tank is
installed properly (Fig. 2-20).
• Recovery tank full/automatic shut-
off engaged.
• Remove and empty recovery tank.
Problem: Cleaner pushes a line of
dry debris in front of it
Possible cause
Possible solution
• Cleaner not set for dry operation
• Press wet/dry pedal to “DRY PICK -
UP” position.
• Debris is too large to clear
squeegee
• Tip nozzle off floor by pushing down
on handle.
Problem: Clean solution won’t dis-
pense
Possible cause
Possible solution
• Solution tank not firmly in place
• Make sure tank is securely locked in
position.
• Solution tank empty
• Refill solution tank.
Problem: Brushes won’t rotate
Possible cause
Possible solution
• Cleaner set for “WET/DRY PICK-
UP”
• Move wet control switch down to
“WET SCRUB” position (Fig. 2-7).
• Circuit breaker inside cleaner is
tripped
• Turn cleaner off, wait one minute,
then turn cleaner on again.
• Filter or filter lid missing or not
properly positioned.
• Ensure recovery tank filter and filter
lid are properly installed (Fig. 2-22).