


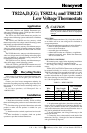
2
Fig. 3—T822A,D and T8022D in typical oil
heating application.
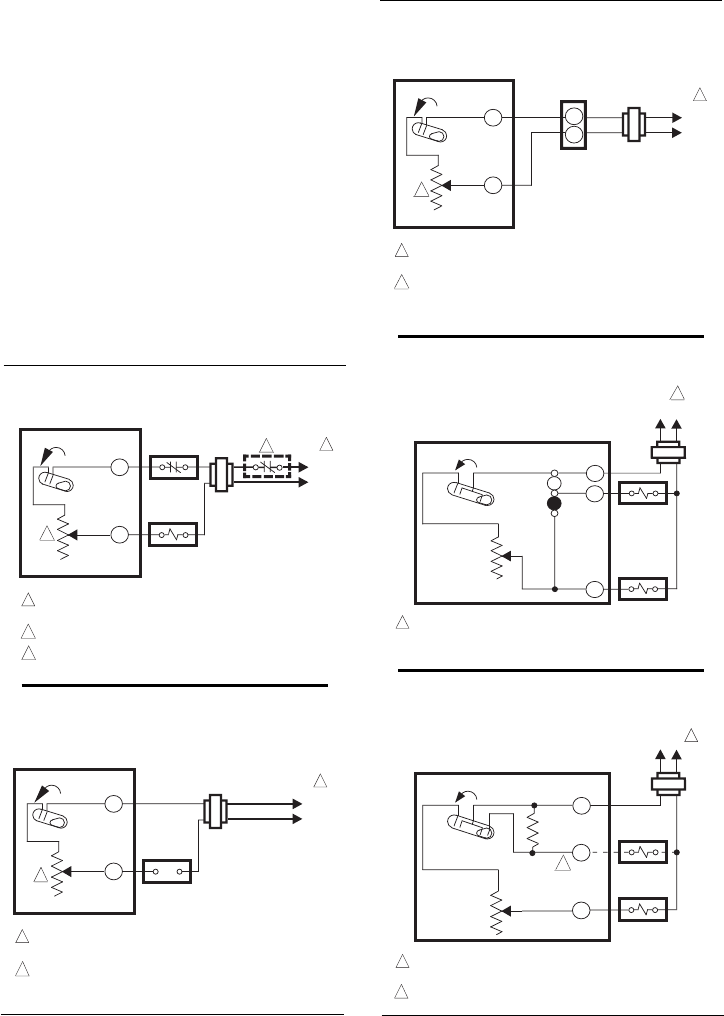
Fig. 4—T822F in typical heating application.
Fig. 5—T822G in typical heating or cooling
application.
POWER SUPPLY. PROVIDE DISCONNECT MEANS AND OVERLOAD
PROTECTION AS REQUIRED.
T822D, T8022D ADJUSTABLE HEAT ANTICIPATOR SHOWN. T822A
HAS A FIXED HEAT ANTICIPATOR.
M1184A
T822A,D; T8022D
1
1
L1
(HOT)
L2
R
TEMP. FALL
W
H1
H1
ANTICIPATOR
OIL
PRIMARY
T
T
2
2
3
3
POWER SUPPLY. PROVIDE DISCONNECT MEANS AND OVERLOAD
PROTECTION AS REQUIRED.
ALTERNATE LIMIT CONTROL LOCATION.
T822D, T8022D ADJUSTABLE HEAT ANTICIPATOR SHOWN. T822A
HAS A FIXED HEAT ANTICIPATOR.
M1164B
T822A,D; T8022D
1
1
L1
(HOT)
L2
LIMIT
CONTROL
R
TEMP. FALL
W
H1
2
H1
ANTICIPATOR
ELECTRIC
HEAT RELAY
2
POWER SUPPLY. PROVIDE DISCONNECT MEANS AND OVERLOAD
PROTECTION AS REQUIRED.
T822D, T8022D ADJUSTABLE HEAT ANTICIPATOR. T822A HAS A
FIXED HEAT ANTICIPATOR.
M1183A
T822A,D; T8022D
1
1
L1
(HOT)
L2
R
TEMP. FALL
W
H1
H1
ANTICIPATOR
GAS
CONTROL
2
2
POWER SUPPLY. PROVIDE DISCONNECT MEANS AND OVERLOAD
PROTECTION AS REQUIRED.
M5538
T822F
L1
(HOT)
L2
TEMP. FALL
H1
H1
ANTICIPATOR
R
G
W
FAN RELAY
HEAT RELAY
1
FAN
SWITCH
ON
AUTO
1
POWER SUPPLY. PROVIDE DISCONNECT MEANS AND OVERLOAD
PROTECTION AS REQUIRED.
M5512
T822G
L1
(HOT)
L2
TEMP. FALL
H1
H1
ANTICIPATOR
R
Y
W
COOL RELAY
HEAT RELAY
1
1
C1
C1
ANTICIPATOR
2
USE EITHER "W" OR "Y" TERMINAL, BUT NOT BOTH.
2
4. Remove thermostat cover by pulling outward on
bottom edge of cover until it snaps free of the thermostat
base. Carefully remove and discard the foam plastic ship-
ping insert. This insert protects the switch and bimetal
assembly during shipping.
5. Set the adjustable heat anticipator indicator
(T822D,F,G only) to match the current draw of the primary
heating control (see Heat Anticipator Setting).
6. Push excess wire back through the hole and plug any
opening with insulation to prevent drafts that may affect
thermostat performance.
7. Loosely fasten the thermostat to the wall or outlet
box with a screw through the top mounting hole. Do not
tighten.
8. Level the thermostat exactly using a spirit level or
plumb line. Tighten the mounting screws.
IMPORTANT: An incorrectly leveled thermostat will
cause the temperature control to deviate from setpoint.
9. Replace the thermostat cover.
Fig. 1—T822A,D and T8022D in typical electric
heating application.
Fig. 2—T822A,D and T8022D in typical gas
heating application.