


Checkout
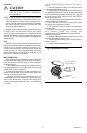
CAUTION
Do not check operation by shorting across termi-
nals of system controls. This will damage the heat
anticipator.
IMPORTANT: To assure accurate temperature control, do
not touch or breathe on bimetal of thermometer.
HEATING
With system switch set at HEAT and fan switch at AUTO,
move the temperature setting lever about 10° F
[6° C] above room temperature.
Gas- or oil-fired systems—heating should start; fan
should start after a short delay.
Single-stage heat pump or central electric heat sys-
tems—both heating and fan should start immediately.
Move temperature setting lever 10° F [6° C] below room
temperature.
Gas- or oil-fired systems—heating should shut off and
fan should shut off after a short delay.
Single-stage heat pump or central electric heat sys-
tems—heating and fan should shut off immediately.
8. With the system operating through the ammeter, wait
one minute, then read the ammeter.
9. Turn the system switch to OFF, and turn off power.
10. Adjust the heat anticipator to match the reading on the
ammeter.
11. Disconnect the ammeter, reconnect the W wire, and
mount the thermostat. Continue with system checkout.
NOTE: The heat anticipator may require further adjustment
for best performance. To lengthen burner-on time, move
the indicator in the direction of the longer arrows—not
more than a half scale marking at a time. To shorten
burner-on time, move indicator in opposite direction.
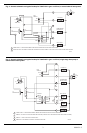
HEAT ANTICIPATOR SETTINGS (Fig. 4 only)
Heat Pump Systems (for about 3 cycles per hour)
Using ‘B’ Terminal
Set adjustable anticipator to 140 percent of combined
current draw of compressor and fan relays.
Using ‘O’ Terminal
Set adjustable anticipator to maximum scale setting. Limit
combined load current of compressor and fan relays to 0.8
amp, because cooling anticipator provides anticipation dur-
ing heat cycle in this hookup.
Electric Systems (with auto fan in heating and cooling)
Set adjustable anticipator to combined current draw of
heating and fan relays.
Gas- and Oil- Fired Systems
(without auto fan in heating)
Set adjustable anticipator to current draw of heat relay or
valve.
4
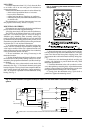
9. Adjust temperature setting lever so mercury bulb is in
horizontal position. See Fig. 1.
10. Carefully replace thermostat cover.
IMPORTANT: An incorrectly leveled thermostat will cause
the temperature control to deviate from setpoint.
Setting and Adjustment
TEMPERATURE SETTING
Push the temperature setting lever to the desired control
point on the temperature scale. The same lever controls both
heating and cooling.
SYSTEM AND FAN SWITCHING
The T834C features SYSTEM and FAN switches for
control of the heating-cooling and fan systems.
The SYSTEM switch controls system operation as fol-
lows:
HEAT: Heating system only operates.
OFF: Both heating and cooling control systems are dis-
connected.
COOL: Cooling system only operates.
The FAN switch controls fan operation as follows:
AUTO: For gas- or oil-fired systems, the fan operates in
response to the thermostat in cooling; fan operates in
response to the plenum fan control in heating. For
single-stage heat pump and electric heat systems, the
fan operates in response to the thermostat in both
heating and cooling.
ON: The fan runs continuously.
To switch positions, use thumb and index finger to slide
lever to desired position. Switch lever must stop directly over
desired function indicator mark for proper circuit operation.
HEAT ANTICIPATOR SETTING
IMPORTANT: The T834C Thermostat has an adjustable
heat anticipator and equipment will cycle properly
ONLY IF THE ANTICIPATOR IS ADJUSTED TO
MATCH THE CURRENT DRAW OF THE ENTIRE
SYSTEM or as recommended by the equipment
manufacturer. Use this thermostat only on systems
with current draws that fall within the range of the
heat anticipator. Do not use this device on Powerpile
(millivolt) Systems.
A current rating is usually stamped in the nameplate of the
primary control. Set the adjustable heat anticipator indicator
to match the value given on the nameplate, except on thermo-
stats used in systems as shown in Figs. 2-4. See Heat
Anticipator Settings (Figs. 2-4).
If current rating is not available, proceed as follows to
determine the rating:
1. Turn off power.
2. Wire thermostat, but do not mount it on the wall.
3. Connect ammeter between W wire and W terminal on
the thermostat.
4. Prepare the system for operation.
5. Turn on power.
6. Turn system switch to heat.
7. Increase thermostat setpoint as necessary to get system
operating.