


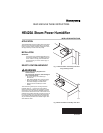


HE420A STEAM POWER HUMIDIFIER
69-1108—2 4
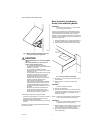
FINISH MOUNTING AND PLUMBING
THE HUMIDIFIER
1. Mount the humidifier as instructed in the Select
Location and Mount section.
2. Route the tubing to the humidifier float valve.
IMPORTANT
Keep the tubing away from sharp edges.
3. Connect the remaining end of the tubing to the
humidifier float valve.
4. Open the saddle valve so the water flows slowly
into the water pan.
5. Check the compression fittings at the saddle valve
and the float valve. Tighten the fitting slightly to stop
any leakage.
6. Connect the overflow provision of the humidifier to a
suitable waste drain.
NOTE: 3/8 in. (9.525 mm) I.D. tubing can be easily
attached to the overflow fitting.
7. Support the drain line at several locations to pre-
vent kinks. Be sure to provide support near any
heat source.
8. Use a male 1-1/2 in. NPT fitting (not supplied) to
connect the humidifier overflow provision.
INSTALL THE AUTOMATIC
FLUSHING TIMER
Refer to the “Installation Instructions for the
Programmable Humidifier Automatic Flushing Timer” for
complete instruction.
INSTALL THE AUTOMATIC
HUMIDISTAT CONTROL
For additional humidistat installation instruction, refer to
the manual “Wiring Instructions for High-Capacity Steam
Humidifiers.”
WARNING
Electrocution Hazard. Disconnect electrical
power to the furnace before beginning
installation.
Sharp edges. Use caution when cutting plenum
openings and handling ductwork
CAUTION
Do not mount the compensating humidistat on
the supply duct or plenum. The unit will not
withstand supply temperatures.
Do not set the humidity so high that condensation
forms on windows or walls.
SELECT LOCATION AND MOUNT
1. Check contents of the humidistat carton. Compo-
nents include:
• Automatic humidistat
• Outdoor temperature sensor
• Sensor shield
• Manual mode faceplate
• Mounting bracket
2. Disassemble the humidistat. Pull knob off, then
remove the cover by inserting a screwdriver in the
slot on the right side of the humidistat.
3. Mount the humidistat on the COLD AIR RETURN.
Select a mounting location at least 6 inches
upstream from the fresh air intake ductwork, if appli-
cable.
4. Select an exterior location to mount the Outdoor
Temperature Sensor. Location must meet the fol-
lowing requirements. Incorrect indoor humidity lev-
els will result if these requirements are not met.
• Mount on North, Northeast or Northwest side of
house.
• Mount at least 3 feet from all exhaust vents.
• Mount above expected snow line.
NOTE: For manual operation, do not install the outdoor
sensor wire.
5. Locate an existing Indoor/Outdoor access hole.
• Make sure there are no active high-voltage
wires in the hole.
• As an alternative, the sensor can be mounted in
the center of a 6-inch fresh air intake duct (must
be no farther than 30 inches from the outside
wall).
NOTE: If neither configuration is possible, the compen-
sating humidistat can be installed to operate
manually. See Installing the Humidistat to Oper-
ate Manually, below.
6. Route the sensor wire to the selected location. Run
wire between the compensating humidistat and the
outdoor sensor lead. If the sensor is outdoors, snap
the probe end of the sensor into the sensor shield
and attach it to an exterior wall. The probe must be
completely covered by the shield.
NOTE: Outdoor temperature sensor wire must not
exceed 30 feet in length.
CAUTION
Do not run outdoor temperature sensor wire
alongside wires carrying high voltage (120
VAC or higher). Do not run the sensor wire
through conduit.
7. Attach the Sensor Wire to the humidistat. Strip the
connecting wire 1/4 inch and attach the two internal
wires to the terminals labeled “Outdoor Tempera-
ture Sensor” on the humidistat.
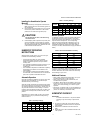
8. Select a power source. The voltage to the humidis-
tat must be between 22-30 VAC.
NOTE: The compensating humidistat will operate prop-
erly only with a continuous power source. A min-
imum 10 volt amperes is required.
9. Connect the humidistat to the humidifier. Strip the
wires used for all the humidistat terminal connec-
tions 1/4 inch.
10. Set the humidistat. Consult the compensating humi-
distat homeowner's manual for proper humidity set-
tings.