


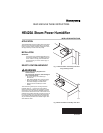


HE420A STEAM POWER HUMIDIFIER
69-1108—2 2
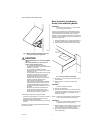
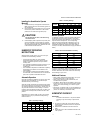
Fig. 3. Mount humidifier horizontally under duct
extension using mounting bracket.
CAUTION
Steam Condensation, Fire and Freezing Water
Hazard.
Can cause failure of fan or limit control or
result in water damage to home.
• Do not install the humidifier where the
sidewalls of the return air duct are constructed
of wood (i.e. floor joist).
• Do not Install the humidifier where the
temperature is lower than 32°F (O°C) or higher
than 200°F (93°C).
• For all installation configurations, the mounting
area must be strong enough to support the
humidifier's weight when it is full of water
(approximately 18 lbs.), and to hold the
humidifier in a level position for safe, reliable
operation. Otherwise, additional duct
reinforcement will be necessary.
• If the installation includes exposed insulated
materials, a section of the ductwork must be
removed and replaced with rigid metal duct
extending at least 6 feet downstream from the
humidifier.
• Mount the unit at least 4-to-6 feet after the
plenum transition. Avoid sudden turns or
transitions in the ductwork in the immediate
area downstream from the humidifier.
There are three possible mounting procedures:
• horizontally under at least a 10 in. (254 mm) wide duct
using the mounting bracket (preferred mounting);
• horizontally under a reinforced duct;
• horizontally under a duct extension using the mounting
bracket.
Decide which mounting is appropriate and follow those
mounting instructions.
Mount Horizontally Using Mounting
Bracket (Preferred Mounting Method)
IMPORTANT
The duct must be at least 10 in. (254 mm) wide
to use this mounting method.
The duct is strongest when using the bracket mounting
method because the least amount of duct reinforcement
is required because of the bracket location. See Fig. 1.
However, in some installations, reinforcement may still be
necessary to help support the weight of the humidifier and
keep the humidifier level.
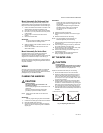
1.
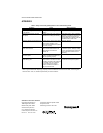
Position the bracket 1/2 in. (13 mm) from the edge of
the duct and trace around the bracket. See Fig. 4.
2. Once the outline has been traced, remove bracket.
Fig. 4. Position bracket to duct edge.
3. Drill a 3/8 in. (10 mm) hole within the center portion
of the bracket.
4. Use tin snips to cut around the outline of the
bracket.
IMPORTANT
Follow the dotted line carefully.
5. Remove the sheet metal.
6. Use two 8-32 screws and nuts to attach the mount-
ing bracket (L shaped with six holes) to the top/front
surface of the humidifier. The humidifier is now
ready for mounting.
NOTE: Position the humidifier so the upward protrusion
of the U is on the side toward the reservoir.
IMPORTANT
Do not mount the humidifier until the water level
is adjusted. See the Plumbing section.
7. Slide the flanges of the humidifier reservoir into the
mounting bracket until the reservoir’s front flange
comes into contact with the edge of the duct.
8. Secure the humidifier to the duct with three no. 8
sheet metal screws.
M10580B
H
U
M
ID
IF
IE
R
H
U
M
I
D
I
F
IC
A
T
E
U
R
M23374
BRACKET
1/2 IN. (13 MM)
FROM EDGE