


F111 (SERIES 1,2) IN CEILING MEDIA AIR CLEANER
5 68-0198EF-4 Rev. 11-07
• Never rest the air cleaner on the T-bar.
5. Level the air cleaner.
6. Turn the air cleaner power on and check for proper
operation for 2 to 3 minutes. There should be a smooth,
powerful blower sound and air discharging from both
ends of the air cleaner.
7. Turn off the power.
8. Install the particle filter. Note airflow direction arrows if
present. If arrows are not present, install the filter with
the fasteners facing downward.
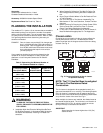
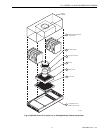
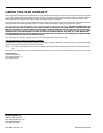
Fig. 5. Fasten cabinet to a structural support.
9. Fasten the filter tabs. Be sure there is a snapping sound
when fastened. The tabs are commercial Velcro and
require more force than lightly pushing them together.
IMPORTANT
Do not touch the pleated filter media. Handle only the
filter frame to prevent damage to the filter media.
10. Remove CPZ™ sorbent modules (select models) from
their packaging and install one module into each cavity.
Be sure the fastener tabs are facing downward and fas-
ten them.
11. For Series 1 only.
Be sure the fastener tabs are facing
downward and fasten them.
12. For Series 2 only. Be sure both catches are turned
down and filter rests firmly on catches.
13. Install the prefilter in the air cleaner lid. Position the
metal screen mesh so it is facing upward when the lid is
closed.
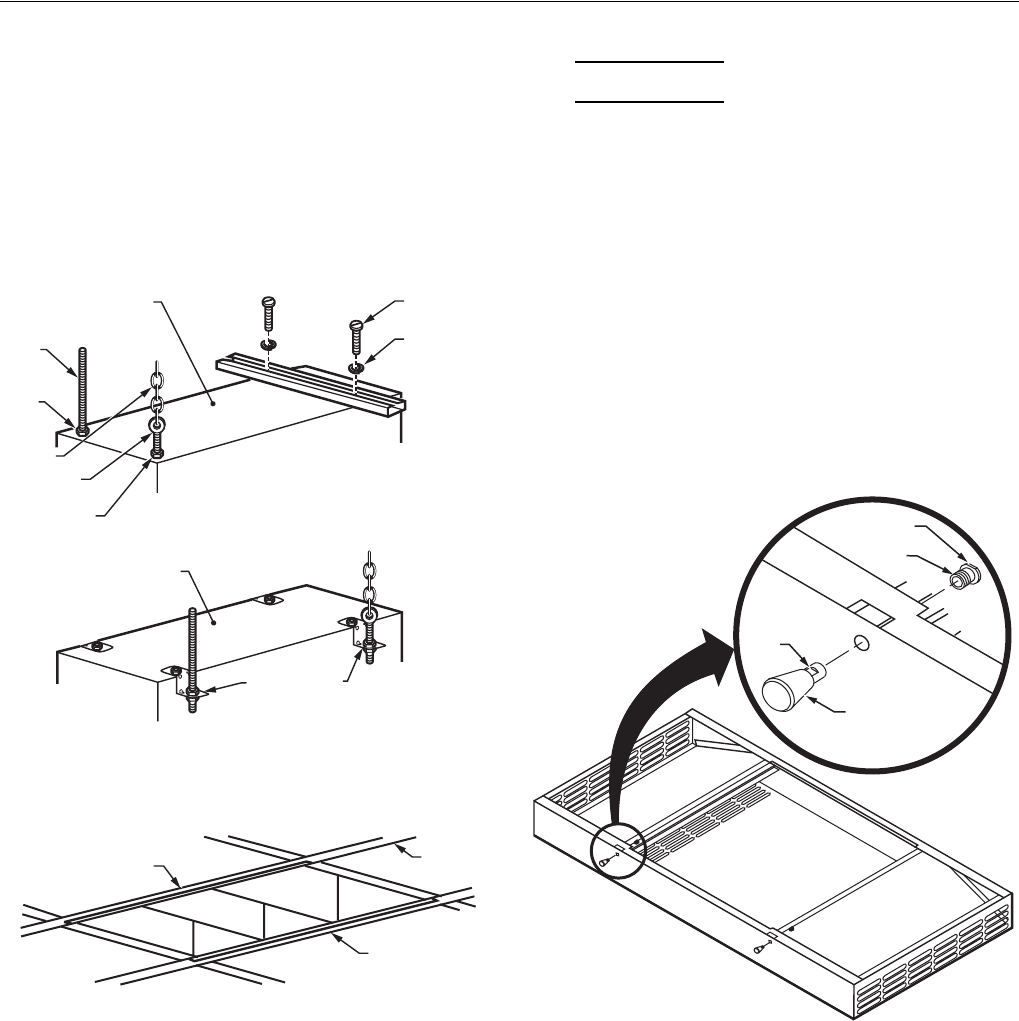
Lid Assembly
The F111 lid is held in place by two separable hinges and two
spring loaded plungers. To install the spring loaded plungers
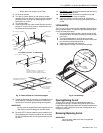
on the lid follow these steps:
1. Pull the plunger back and twist a quarter turn to reveal
the wrench flat on the body of the spring loaded plunger
(see Fig 6.)
2. Turn the threaded barrel out of the spring plunger.
3. Insert the threaded barrel through the hole in the lid and
turn the spring loaded plunger onto it.
4. Tighten the assembly with wrenches.
5. Repeat steps 1 through 4 for the second plunger.
Fig. 6. Lid assembly.
Opening/Closing the Lid
To open the lid, pull the spring loaded plungers back to
disengage the plunger. Carefully swing the lid open on the
hinges while supporting the filter and/or adsorbent modules as
required. To close, swing the lid into the closed position and
engage the plungers.
Removing /Replacing the Lid
IMPORTANT
The lid is heavy. Make sure that it is supported
before removing.
CHAIN
NOTE:
FASTEN SECURELY TO STRUCTURAL
SUPPORT SYSTEM, I.E. BAR JOIST,
CONCRETE SLAB OR TIMBER FRAMING.
HEX BOLT
LOCK
WASHER
M10892
TOP OF METAL CABINET
EYEBOLT
BOTTOM FLANGE AGAINST
UNDERSIDE OF TEES
JAM NUT
3/8 IN. X 16T
"Z" BRACKET (4)
JAM
NUT
THREADED
ROD
BOTTOM VIEW OF
UNIT WITHOUT
LID ASSEMBLY
CEILING
TEE
O
R
U
SI
N
G OPTIO
NA
L
"
Z
"
BRACK
ETS
TOP OF METAL CABINET
THREADED
BARREL
SPRING
LOADED
PLUNGER
WRENCH FLAT
WRENCH
FLAT
M11994