


F111 (SERIES 1,2) IN CEILING MEDIA AIR CLEANER
68-0198EF-4 Revised 11-07 4
INSTALLATION
WARNING
Explosion Hazard Possible.
Can cause personal injury or equipment damage.
Do not install or use the F111 (series 1,2) air cleaner
where there is any danger of gas, vapor or dust
explosion.
IMPORTANT
This air cleaner has not been investigated for use in
the ceilings of fire-resistant assemblies.
CAUTION
Electrical Hazard.
Can cause personal injury or equipment damage.
Turn off power before installing or servicing the air
cleaner.
IMPORTANT
Stand on a stable platform when working with the air
cleaner.
When Installing this Product…
1. Read these instructions carefully. Failure to follow them
could damage the product or cause a hazardous condi-
tion.
2. Check the ratings given in the instructions and on the
product to make sure the product is suitable for your
application.
3. Installer must be a trained, experienced service techni-
cian.
4. After installation is complete, check out product opera-
tion as provided in these instructions.
Unpack the Air Cleaner
Check that all components are included. The unit consists of:
• cabinet and grille/door assembly
• media modules
• literature.
• latches (2)
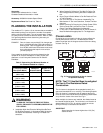
Make Opening (if Mounting in a Drop Ceiling)
1. Size the opening to fit the air cleaner cabinet as closely
as possible.
2. Frame the opening to provide adequate support for the
cabinet. The cabinet must fit snugly in the opening;
allow no more than 1/4 in. (6 mm) from the opening to
each side of the cabinet.
3. Cover the framing and any unused portion of the open-
ing with wallboard, plywood, or other material and finish
to match the ceiling.
Electrical Hookup
All wiring must comply with applicable codes and ordinances.
The power source must agree with the model type: 120V,
60 Hz; 208/230V, 50/60 Hz or 277V, 60 Hz. The air cleaners
are internally prewired.
1. Locate the prepunched hole in the side of the cabinet.
2. Remove the air cleaner lid.
3. Remove the connection box cover plate in the center
cavity of the air cleaner.
4. Refer to Fig. 3 and 4 for typical wiring diagrams.
WARNING
Risk of Fire or Electric Shock.
Can cause personal injury or equipment damage.
Use only Honeywell 32000234 Variable Speed Switch
(accessory) to regulate air cleaner speed. Using a
different speed controller may void the warranty.
IMPORTANT
• Be sure the air cleaner is grounded for correct
operation and safety.
• Canadian installation: NEVER install in ceilings with
thermal insulation value greater than R-40.
Fig. 3. Typical F111 (series 1,2) 120V, 60 Hz or
208/230, 50/60 Hz wiring diagram.
Fig. 4. Typical F111 (series 1,2) 277V,
60 Hz wiring diagram.
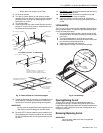
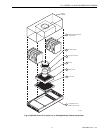
Mount Air Cleaner Cabinet
The air cleaner can be mounted in a drop ceiling system or
hung in an open area. Both mounting methods require the air
cleaner to be level and positioned facing downward for correct
operation.
1. Remove the door/grille from the carton and set it aside.
2. Remove all filters
3. Fit the cabinet into the prepared ceiling opening or
position on the ceiling.
4. Use the four 3/8 x 16T internal nuts (one at each corner)
to fasten the cabinet to a structural support (bar joist,
concrete slab or timber framing). See Fig. 5.
NOTES:
• All external hardware is furnished by the installer.
• When using the suspension system of mounting,
be sure to include a means for leveling adjust-
ment after installation.
M12657
CAPACITOR
WHITE
GREEN
BLACK
FACTORY WIRING
BROWN
EXTERNAL
WIRING BY
INSTALLER
MOTOR
M11748
CAPACITOR
PURPLE
GREEN
BLACK
FACTORY WIRING
BROWN
EXTERNAL
WIRING BY
INSTALLER
BROWN
STRIPE
MOTOR
277 V