


GETTING
STARTED
Important Installation Requirements
Personal Safety
• Wear safety glasses while installing the unit.
• Do not cut into any air conditioning or electrical line.
• Follow professional safety standards and all local codes for plumbing, electrical, and mechanical
considerations.
Before Mounting
• Using the gure on the cover and the lists on the inside cover, make sure that you have all the components for
your Honeywell Media Air Cleaner and the tools to install it.
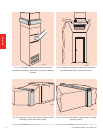
• Ensure airow direction through the Honeywell Media Air Cleaner matches the arrows on the lter cartridge.
The arrows should point in the direction of the airow.
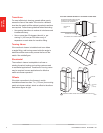
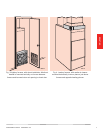
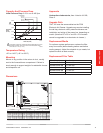
• Choose a location that is readily accessible for checking and replacing the lter. Allow at least 26 in. (660 mm)
clearance in front of the unit for removal of the cartridge.
• Install the media air lter where the temperature will not exceed the ratings in the Specications.
• Do not mount in the supply air duct.
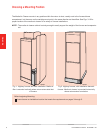
NOTE: Generally, the best location is in the return air duct next to the blower compartment so the media air
cleaner can help to keep the blower motor and evaporator coils clean.
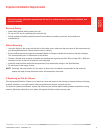
If Replacing an Old Air Cleaner
If the Honeywell Media Air Cleaner is not identical in size and shape to the existing air cleaner, before performing
a retrot installation, you might need to add duct transitions to ensure a smooth air ow.
For optimum system performance, replace the lter every six months (before heating season and before cooling
season). Adjust the schedule to your needs, but replace the lter at least once per year.
Failure to comply with these requirements will result in voided warranty, improper installation, and
service callbacks.
F100 Media Air Cleaner 68-0239EF—05
5