


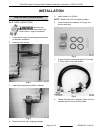
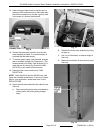

15. Insert tubing provided into the overflow port on
the back of the softener and run drain lower than
the cabinet connection to provide a gravity drain
in the event of a internal cabinet leak.
Fig. 10
16. Review the meter disc selection chart and the
water analysis provided. If no water analysis is
provided test the water supply.
17. To test the water supply, use the water analysis
test kit available through Pro Products Inc. The
recommended kit is #2401 Field Analysis Kit. To
order the test kit contact Pro Products at 800-
285-9176 or visit www.ProProducts.com.
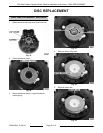
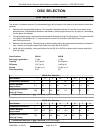
18. Determine the correct number disc. DISC
SELECTION
NOTE: Both the WS-40 and the WS-80 have a #4
meter disc installed at the factory. If this is not correct
disc for your application, locate meter disc kit and
REPLACE DISC.
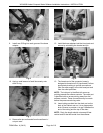
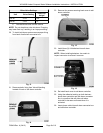
19. Remove brine valve assembly from cabinet to set
float cup.
A. Disconnect tubing from brine valve elbow by
holding collet and pulling tubing straight
away.
Fig. 11
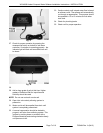
B. Remove the brine valve assembly by lifting
straight up.
C. Set it on a flat surface, to mesure height of
float cup.
D. Measure from bottom of brine valve to top of
float cup.
Fig. 12
WS-40/80 Hobart Compact Water Softener Installation Instructions - INSTALLATION
Page 5 of 10 F25404 Rev. A (0413)