


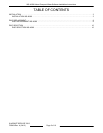


Fig. 5
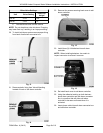
9. Install one O-Ring into each groove of the brass
adapter.
Fig. 6
10. Apply a small amount of seal lube evenly onto
each O-ring.
Fig. 7
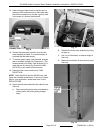
11. Remove the pin and bracket from the softener in/
out port area.
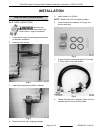
Fig. 8
12. Install the brass adapters into the in/out ports and
secure by reinstalling the bracket and pin.
Fig. 9
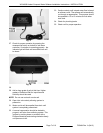
13. The female end of the connector hoses is
designed to thread onto 3/4" pipe thread. Perform
appropriate plumbing to provide connections
from the water supply to the inlet hose/port and
from the outlet port/hose.
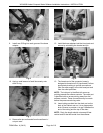
NOTE: The inlet port is identified with an arrow
pointing towards the softener controls. The outlet port
is identified with an arrow pointing away from the
softener controls. These connections may be made
before the pressure reducing valve.
14. Insert tubing provided into the drain port on the
back of the cabinet and run it to an appropriate
drain. Be sure to provide a “air gap” between the
end of the tubing and the top of the drain.
NOTE: Drain line length should not exceed 8 feet
vertical and 30 feet horizontal from the softener.
WS-40/80 Hobart Compact Water Softener Installation Instructions - INSTALLATION
F25404 Rev. A (0413) Page 4 of 10