


– 4 –
Installation, Operation, and Care of
MODELS FD3-150, FD3-200, & FD3-300
FOOD WASTE DISPOSERS
SAVE THESE INSTRUCTIONS
GENERAL
The disposer features removable hardened steel components and reversible rotation with grinding in
both directions. The disposer is self-feeding, making it unnecessary to force the food waste into the
grinding mechanism.
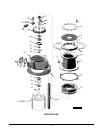
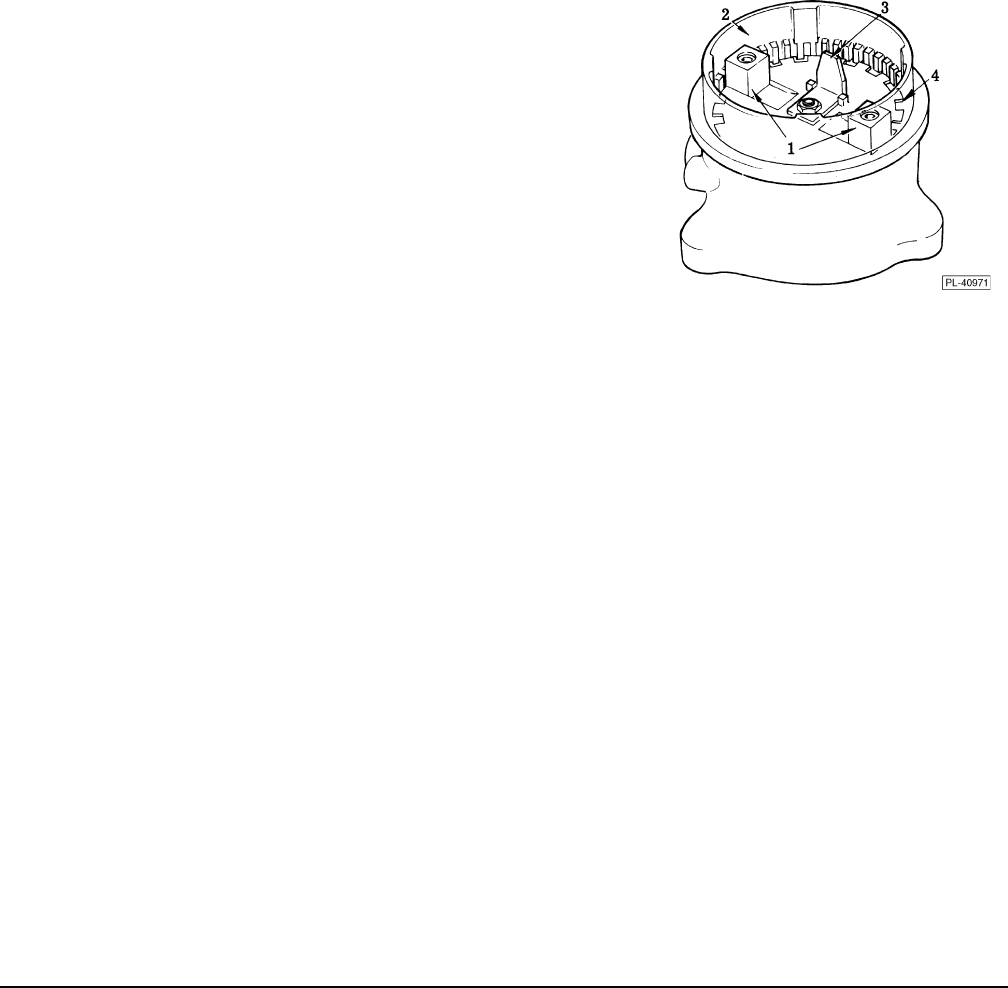
The FD3 Series disposers utilize hardened steel cutter blocks
(1, Fig. 1) mounted to a rotating flywheel (4, Fig. 1) and a
stationary shredder ring (2 Fig. 1) to grind food waste to a small
particle size for discharge through waste lines. With the motor
running and flushing water turned on, food waste is reduced to
grinding size by the rotating "hi-bulk" cutter (3, Fig. 1). Grinding
occurs as the food waste is forced against the shredder ring by
the cutter blocks and the centrifugal force due to rotation. The
flushing water aids the grinding action and discharges ground
food waste into the waste line.
Control groups and accessory groups are available to suit
each installation.
Fig. 1
INSTALLATION
Immediately after unpacking the disposer, check for possible shipping damage. If the disposer is found
to be damaged, save the packaging material and contact the carrier within 15 days of delivery.
Prior to installation, test the electrical service to make sure that it agrees with the specifications on the
disposer data plate.
Use legs and temporary blocking to support disposer during installation to avoid excessive stress at
welded or soldered cone to table connection.
ASSEMBLY
Use the following procedure to attach the disposer assembly to the cone (see Figs. 2 and 5).
Raise the disposer into position using the adjustable feet to bring the disposer into firm contact with
the cone flange. Do not place the weight of the disposer on the cone.
Turn each adjustable foot as required to complete height and level adjustments.
Assemble the clamp ring halves using the ten screws and tighten screws finger tight. Rotate disposer
to the desired position. Tighten the ten screws evenly to form a water tight joint.