Heatilator • NDI30, NDI30-SP, NDI35, NDI35-SP, NDI30-SPFK, NDI35-SPFK • 2226-900 Rev. G • 4/11 36
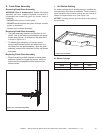
A. Standing Pilot Ignition System
13
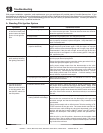
Troubleshooting
With proper installation, operation, and maintenance your gas appliance will provide years of trouble-free service. If you
do experience a problem, this troubleshooting guide will assist a qualifi ed technician in the diagnosis of a problem and the
corrective action to be taken. This troubleshooting guide can only be used by a qualifi ed technician. Contact your dealer to
arrange a service call by a qualifi ed technician.
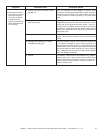
Symptom Possible Causes Corrective Action
1. After repeated triggering
of the red or black piezo
ignitor button, the spark
ignitor will not light the
pilot.
A. No gas or low gas pressure. Check the remote shut-off valves from the appliance. Usually, there
is a valve near the gas main. There can be more than one valve be-
tween the appliance and the main.
B. No lp in tank. Check the LP (propane) tank. You may be out of fuel.
C. Ignitor. Check the spark at the electrode and pilot. If no spark and electrode
wire is properly connected, replace the ignitor. Verify that there is no
short in electrode wire.
D. Pilot or misaligned electrode
(spark at electrode).
Using match, light the pilot. If the pilot lights, turn off the pilot and
trigger the piezo ignitor button again. If the pilot lights, an improper
gas/air mixture caused the bad lighting and a longer purge period is
recommended. If the pilot will not light, ensure the gap at the elec-
trode and pilot is one-eighth in. to have a strong spark. If the gap is
OK, replace the pilot.
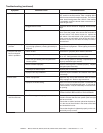
2. The pilot will not stay lit
after carefully following
the lighting instructions.
A. Thermocouple. Check that the pilot fl ame impinges on the thermocouple. Adjust the
pilot for proper fl ame impingement.
Ensure that the thermocouple connection at the gas valve is fully in-
serted and tight (hand tighten plus 1/4 turn).
Verify proper voltage output from the thermocouple to the valve.
Place one millivolt meter lead wire on the thermocouple copper lead.
Place the second lead wire on the solder button on the back of the
valve (blue wire). Start the pilot and hold the valve knob in. The mil-
livolt reading should read 8-16 millivolts. If millivolt reading is less
than 8 millivolts, replace thermocouple.
B. Improper gas inlet pressure. Natural gas should be 5-10 in. w.c. LP should be 11-13 in. w.c. Verify
pressure with manometer.
C. Valve. If the thermocouple is producing 8-16 millivolts, replace control valve.
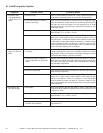
3. The pilot is burning,
there is no burner
fl ame, the valve knob is
in the ON position, and
the ON/OFF switch is in
the ON position.
A. ON/OFF switch or wires. Check the ON/OFF switch and wires for proper connections. Place
the jumper wires across the terminals at the ON/OFF switch. If the
burner comes on, replace the ON/OFF switch. If the ON/OFF switch
is OK, place the jumper wires across the ON/OFF switch wires at the
gas valve. If the burner comes on, the wires are faulty or connections
are bad.
B. Thermopile may not be gen-
erating suffi cient millivoltage.
Check that the pilot fl ame impinges thermopile properly.
Be sure the wire connections from the thermopile at the gas valve
terminals are tight and that the thermopile is fully inserted into the
pilot bracket.
Check the thermopile with a millivolt meter. Take the reading at TH-
TP&TP terminals of the gas valve. The meter should read 350 mil-
livolts minimum, while holding the valve knob depressed in the pilot
position, with the pilot lit, and the ON/OFF switch in the OFF position.
Replace the thermopile if the reading is below the specifi ed mini-
mum.
With the pilot in the ON position, disconnect the thermopile leads
from the valve. Take a reading at the thermopile leads. The reading
should be 350 millivolts minimum. Replace the thermopile if the read-
ing is below the minimum.


