


Heatilator • Novus BV-Mesh • 4031-553 Rev F • 11/07 27
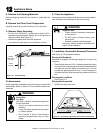
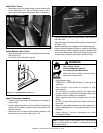
Install Bottom Latch Cover
• Insert bottom latch cover over existing shoulder screws.
See Figure 12.8.
• Push down till the tabs lock in place.
Figure 12.8 Installing Bottom Latch Cover
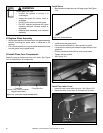
Install Firescreen Assembly
• Thread screen onto screen rod making sure to thread all
screen rings.
• Hold the mesh fi rescreen in one hand until you get the rod
inserted into the side columns to prevent the mesh from
falling off the rod.
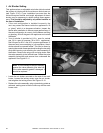
• Insert one end of screen rod into the hole located in the
column as far as it will go. See Figure 12.9
Screen Rod
Screen Rod
Hole in
Side Column
Figure 12.9 Insert Rod Into Side Columns
Note: The fl oor cover in the bottom front of the fi replace
may be covering the UL labels. It is loose and can be
removed/replaced.
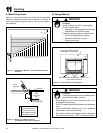
HOT! DO NOT TOUCH.
SEVERE BURNS MAY RESULT.
CLOTHING IGNITION MAY RESULT.
WARNING
• Keep children away.
• CAREFULLY SUPERVISE children in same room as
appliance.
• Alert children and adults to hazards of high
temperatures.
• To avoid burns or clothing ignition, the mesh must
remain closed if children will be present during the
operation and cool down of the fi replace.
• Mesh supplied from factory clipped shut for child
safety.
• Do NOT operate with protective barriers removed or
door open.
• Mesh may be made operable only upon request of a
person responsible for the use and operation of the
fi replace.
• Keep clothing, furniture, draperies and other
combustibles away.
Glass and other surfaces are hot during
operation and cool down.
• Flex the rod and insert it into the hole in the column on
the other side.
• Hook the center of the rod into the screen rod tabs (shown
in Figure 12.4).
• Spread fi rescreen to the edges of the fi rebox opening.
• Hairpin clips are shipped in place in a hole in the bottom
of each column. After the screen is in place, squeeze clips
and remove from holes. Thread clip through screen (one
on each side), squeeze slip and re-insert into holes.
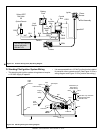
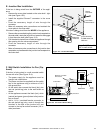
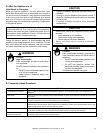
Install Floor Cover
• Install fl oor cover with brake fl ange up and towards back
of unit. See Figure 12.7. Do not to place cover on top of
any components. Move components back if necessary.
Figure 12.7 Installing Floor Cover