


3
598-1232-02
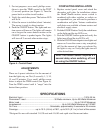
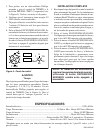
ADJUSTMENTS
Time
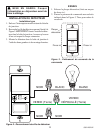
There are 6 preset selections for the amount of
time the lights stay on: Test (5 seconds), 1, 5, 10,
15, and 25 minutes. Use a small, phillips screw
driver to adjust the TIME control (see Figure 4).
Turn the TIME control until it “snaps” into the
desired time position.
COMPLETING INSTALLATION
1. Replace control panel cover and attach the
decorative wall plate. In installations where
the Heath
®
/Zenith motion sensor switch is
combined with other switches or outlets on
an expanded box, you will need to purchase a
combination wall plate. Various combination
wall plates are available at home centers and
electrical supply stores.
2. Push the ON/OFF button. Verify the switch turns
on the lights and the top LED is on.
3. Push the ON/OFF button again and verify the
lights turn off and the top LED is off.
4. Push the ON/OFF button again to turn lights and
sensor on. Leave the room or stay completely
still for the amount of time you selected for
the lights to stay on. Verify the lights turn off
at the desired time.
SPECIFICATIONS
Electrical Input ..............................................................................................................120V, 60 Hz.
Fluorescent* Load ...................................................30 Watts minimum, Up to 400 Watts Maximum
Motor Load ..................................................................................................Up to 1/8 HP Maximum
Incandescent ........................................................................Up to 500 Watts Maximum at 120VAC
On-Time ...........................................................Selectable, approximately 5 seconds to 25 minutes
Coverage ................................up to 15 ft. (4.6 m) at 180°, up to 30 ft. (9.1 m) in front of the sensor
*Designed for use with standard 3 ft./30 watt and 4 ft./40 watt rapid-start fluorescent tubes.
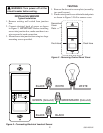
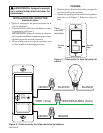
3. For test purposes, use a small, phillips screw
-
driver to turn the TIME control to the TEST
(5 second) position (see Figure 4). Turn the
power back on at the circuit breaker.
4. Verify the switch has power. The bottom LED
will be lit.
5. Allow the sensor to stabilize (about 1 minute).
The sensor is ready to detect motion.
6. Push the ON/OFF button. The lights and mo-
tion sensor will turn on. The lights will remain
on as long as the sensor detects motion or the
ON/OFF button is pushed again. The lights
will turn off 5 seconds after motion stops.
Figure 4 - Control Panel
TIM E
5
25
10
15
1
Test
Note: The motion sensor requires a 2
second delay when switching off and
on using the ON/OFF button.