


Heat & Glo • EXCLAIM-42C • 4013-094 Rev I • 10/06
15
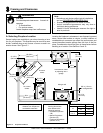
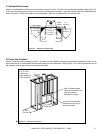
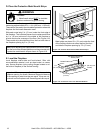
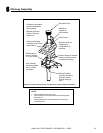
B. Secure the Fireplace
• Position the Fireplace
This fi replace may be placed on either a combustible or
noncombustible continuous fl at surface. Follow the in-
structions for framing in Section 3.D. Slide the fi replace
into position. Be sure to provide the minimum air clear-
ance at the sides and back of the fi replace assembly.
See Section 3.B.
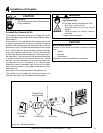
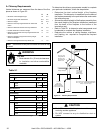
Fire Risk!
• Prevent contact with sagging, loose
insulation.
• Do NOT install against vapor barriers or
exposed insulation.
WARNING
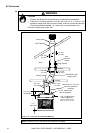
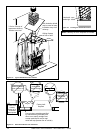
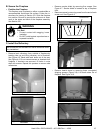
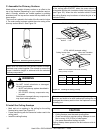
C. Install the Refractory
Figure 4.5 Unpacking Back Refractory
Figure 4.6 Bending Refractory Shipping Tabs
Back Down
• Remove back refractory from outside of fi replace by
bending tabs up and lifting refractory out of brackets.
See Figure 4.5. Bend tabs back down out of the way.
See Figure 4.6. Do not remove screws or brackets from
fi replace. If brackets are removed, fi ll holes in outer
shell with screws. Repeat this process to remove side
refractories.
We recommend two installers for hearth stone and refrac-
tory installation!
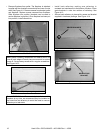
• Remove smoke shield by removing fi ve screws. See
Figure 4.7. Smoke shield is located at top of fi replace
front.
• Remove screens by removing screw from the end of each
screen rod. See Figure 4.8.
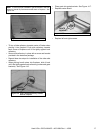
Figure 4.9 Shipping Spacers
Figure 4.8 Removing the Screen Rods
Front Face
Smoke Shield
Remove these screws.
Skip
Skip
Figure 4.7 Removing Smoke Shield
• Remove hearth stone by removing three corrugated
shipping spacers (Figure 4.9). Lift hearth stone out of
fi replace. See Figure 4.10.
Figure 4.10 Lifting Out the Hearth Stone