


©2002‐2011M.S.CHOHAN.Duplicationinwholeorinpartisprohibited. Page5of6
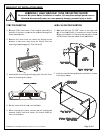
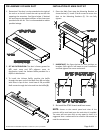
INSTALLATIONOFDUCTEXTENSIONKIT
1. InstalltwoNo.8screwsprovidedintothetopflangeof
theMainDuct,atthee xtensionend.Do nottig hten
thescrews.Leaveenoughspaceforonethicknessof
duct materia l (about the thickness of a credit card)
between the flange and the screw head. See figure
below.
IMPORTANT NOTE: Total length of duct extension
assembly,includinganyfieldsuppliedductbetweenmain
and extensionduct, shouldnot exceed 15effective feet
(accordingtoASHRAEstandards).
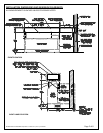
Forsteps2‐4referenceInstallationDimensionsand
MinimumClearancedrawingonpage2
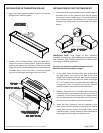
2. Intheroomwherethe MainDuct
kitisattachedto
the Wallsleeve, cut a holein the wallat thesame
heightfromthefloorthattheMainDuctislocated.
Cut thehole1/8" larger thanthe width and height
(10"x5")dimensions oftheDuctExtension.TIP:Use
a long spirit
level to transfer the cut‐out position
exactlybasedonthepositionoftheMainDuct.
3. Measurefromthe endofthe MainDuctwherethe
extensionwillbeconnectedtotheholeinthewall.If
necessary,cuttheDuctExtensiontoalengthwhere
thecutend
protrudesintothewall'sinnerspaceand
oneinchfromtheadjoiningroom'swallsurface.
4. Insert the Duct Extension into the opening in the
wall.InstalltheDuctExtensionbyplacingtheslotted
flangeoverthetwoscrews intheMainDuct. Using
twoNo.8screws,mountbottomof
DuctExtensionto
MountingBracketthroughthebracketslots.
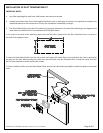
INSTALLATIONOFTRANSITIONCOLLAR
1. Applythefoamgasketincludedinthekittothetop
flangeoftheTransitionCollar.
2. Position the Transition Collar under the Main Duct.
Installthe collaras shownbelow.Ensure the oblong
holesinthetabsontheTransitionCollararecorrectly
alignedwiththecorrespondingholes inthebottomof
the MainDuct. Ensurethecollar iscorrectly aligned
with
theairdischargeopeningonthefrontcover.