


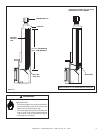


Quadra-Fire • Hudson Bay Insert • 7008-115 Rev. H • 10/08 17
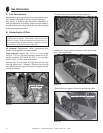
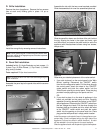
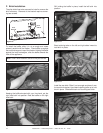
D. Grille Installation
Remove the door of appliance. Remove the four screws
(two at each end) holding grille in place. Lift up to
remove.
Figure 8.5
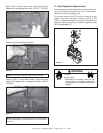
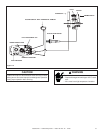
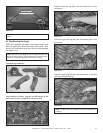
Determine your desired placement of the rocker switch.
1 If you wish to place it on the control panel in the "Main
Burner" opening: Disconnect the "ON/OFF" switch
from the low voltage wire leads. Pull the wires through
the control panel, attach the wires to the "ON/OFF"
rocker switch and push the rocker switch into the
"Main Burner opening on control panel. Place the plug
provided in empty opening on the panel and trim.
OR
2. If you wish to place it on the side of appliance in the
knock out provided on the panel and trim: Carefully
reposition the wiring beneath the firebox to the RIGHT
side of appliance. Disconnect the "ON/OFF" switch from
the low voltage wire leads. Pull the wires through the
knockout plate on the panel and trim, attach the wires
to the "ON/OFF" rocker switch and push the rocker
switch into the opening on the panel and trim. Place
plug provided with panel set in empty switch location.
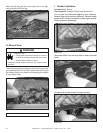
Install the power cord restraint found in the appliance com-
ponent bag. (Cord is shipped exiting the right side of the
appliance, but can be routed in either direction.) A notch
will be needed in the trim piece for the cord restraint.
Slide the appliance back until the panel is tight to the fi replace.
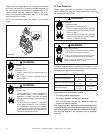
E. Panel Set Installation
Included in kit: (2) Angle Brackets and set screws; (1)
3 piece Trim; (2) Side Panels; (1) Top Panel; (1) Switch
plug; and (8) screws.
Tools required: Philips head screwdriver.
Note: Remove the door from the insert before beginning the
panel installation.
Figure 8.6
Figure 8.7
Figure 8.8
Install the new grille by reversing removal instructions.
Note: Clean glass and gold or nickel with glass cleaner and a
soft cloth, wiping off all fi ngerprints prior to fi rst fi re to prevent
permanent staining.
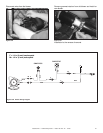
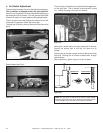
Assemble the panel top to the panel sides with the screws
provided.
SCREWS
SCREWS
BACK OF TOP PANEL
BACK OF TOP PANEL
BACK OF SIDE PANEL
BACK OF SIDE PANEL
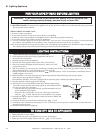
Assemble the trim with the two corner brackets provided.
Slide the assembled trim over the assembled panel set.
Slide the panel/trim down over the face of the unit, behind
the top, aligning the holes in the upper and lower, right
and left corners, and secure the panel and trim set to the
appliance with the attachment screws using four screws,
two per side.
SCREWS
SCREWS