


28
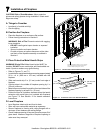
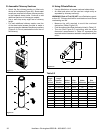
K. Install Attic Insulation Shield
The attic insulation shield must be installed where the
chimney passes into an attic. Its purpose is to prevent
debris and insulation from getting too close to the chimney.
In attic areas where this shield cannot t, or is not used you
must enclose the attic portion of the chimney in a framed
enclosure. If the chimney is fully enclosed through the attic,
an attic insulation shield is not required. Install the attic
insulation shield as follows:
• Remove any insulation from attic oor around the framed
opening.
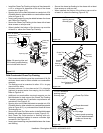
• Assemble chimney sections until at least 18 inches of
chimney extends above the restop.
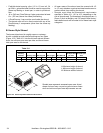
• Slip the attic insulation shield over the chimney until the
base sits squarely on the framed opening (Figure 8.10).
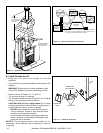
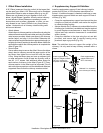
• Secure the attic insulation shield to the top of the framed
opening using at least two 8-penny nails ort wo #8,
1-1/2 in. wood screws per side (Figure 8.11).
• Wrap the collar of the attic insulation shield around the
chimney and fasten it loosely. Slide the collar down to meet
the attic insulation shield. Tighten the bolts to secure the
collar in place (Figure 8.11).
Attic
Insulation
Shield
Firestop
Attic
Figure 8.10
Attic
Attic Shield
Collar
Firestop
Figure 8.11
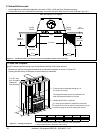
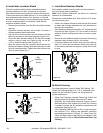
L. Install Roof Radiation Shields
Roof radiation shields must be used to provide protection
for roof or chase framing members.
Note: Roof radiation shields do not allow for a reduced
clearance to combustibles.
Clearance to combustibles must be a minimum of 2” away
from the chimney pipe.
• Install roof radiation shields at either the top of the chase
or where the chimney penetrates the roof, whichever is
the top of the installation.
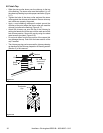
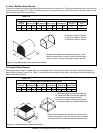
• Roof radiation shields are built with a 1/2” air gap standoff
from the joist face (Figure 8.12). The corners of the roof
radiation shields overlap each other to ensure proper
position.
• Secure the roof radiation shields to the top of the framing
members using screws or nails in the corners.
• If framing members are further away from the chimney
than 2 in., center the roof radiation shield to the chimney
on the framing member and secure in place with screws
or nails.
(4) Roof
Radiation
Shields
Chase
Enclosure
Figure 8.12
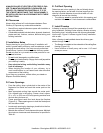
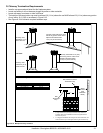
M. Attach Flashing
For chase enclosures, use the Chase Top Flashing. The
Chase Top Flashing allows for a 1-1/2 in. clearance main-
tained from the chimney (Figure 8.14) and provides re-
quired ventilation air.
• Chase Top Flashings (includes Chase Top Collars and
Spacing Clips) are available from your HHT dealer.
• Additional non-combustible structural supports can be
eld-fabricated to help support the Chase Top Flashing
if needed, provided the air ventilation requirements are
maintained. See Figure 8.15.
• If the ChaseTop Flashing (40 in. x 40 in.) does not ensure
the minimum 1/2 in. spacing and perimeter ventilation
requirements as shown in Figure 8.13., use a Chase Top
Collar and eld-construct the ashing as needed for the
chase dimensions. Skip to Field-Constructed Chase Top
Flashing.
Heatilator • Birmingham BIR50-B • 4059-682C • 8/12