


September 1, 2008
7037-135E
Page 2
4300 Wood Stove Series (ACC)
R
B. Leg Kit and Ash Removal Installation
(ARS) for Step Top Uni-Body
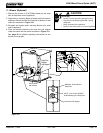
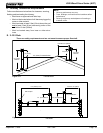
Do NOT tilt the unit on the cast iron legs.
• Tilting could lead to property damage.
• Lift the unit upright and place it into position on the
oor protector.
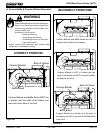
CAUTION
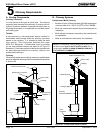
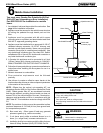
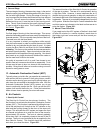
Lay stove flat on its
back on protective
padding or pallet
Insert 2 bottom
screws loosely
Ash Drawer
Leg Brackets
NOTE: The Ash Removal System, must be
installed rst before installing the legs.
Figure 23.1
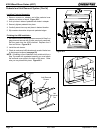
Figure 23.2
Leg Mounting Brackets are
packaged inside firebox.
Leveling Legs at
opposite corners
Installing Leg Kit
1.
Remove leg mounting brackets packaged inside rebox.
2. Attach
the 2 bottom screws of the mounting brackets to
the bottom of the stove with 1/4”-20 Phillips head screws.
These screws are located in the component pack .
Leave the bottom 2 screws loose so you can slide the ash
pan assembly bottom slots over the screw heads. This al-
lows the weight of the ash pan to rest on the screws while
you are attaching the top 2 screws. Once the ash pan is
attached, tighten all screws. Figure 23.2.
. Loosely assemble bolts into the corner of the mounting
brackets for leg attachment. Figure 23.1.
4. Slide legs onto mounting brackets and tighten. Make sure
the legs are up against the bracket. There are leveling
bolts in 2 legs. These leveling legs should be in opposite
corners.
Figure 23.1.
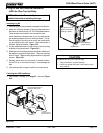
5. Carefully stand stove up and place in desired location.
Do NOT tilt up on the cast iron legs, it could damage the
legs.
6. Use leveling bolts on legs to stabilize and level stove.
Finishing the ARS Installation
1.
Follow steps 1 through on page 22. See also Figure
22.2.