


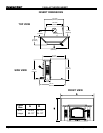


3100-I ACT WOOD INSERT
Page 12 September 1, 2008
R
250-6381D
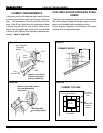
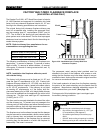
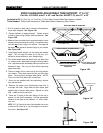
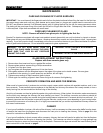
View of "L" Bracket
installed
Kit Includes: (
2) Side Panels, left & right; (1) Panel Top & Fastener package; (2) Side Trim, left & right; (1) Trim Top &
Fastener package.
Tools Needed: Powered Phillips head screw driver.
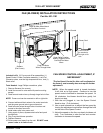
1.
Install the 2 side panels on the insert rst, using the cage nuts already attached to the stove, pushing panels away from the
insert to the maximum distance of the slot. See Figure 12A. (Note: The sides are interchangeable).
2
. Put on the top panel and push straight back. Attach the top panel to the sides using the screws and the panel brackets found in
the fasteners package. Now move the side panels inwards (toward insert) into position and tighten screws.
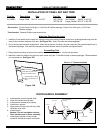
Assembling Trim
1. Place protective covering on surface to be used to assemble the trim pieces. Lay the trim face down.
2. Attach the 2 side trim pieces to the top trim at each corner using the “L” bracket included in fasteners package. Slide assembled
trim over panel set. See Figure 12B.
Figure 12A
Figure 12B
Adjust position by sliding
left or right after top is in
place.
Install sides and push out to
maximum distance of slot.
Panel brackets
831-0862 Large, Gold 50-1/2” x 34-1/2”
Attaching Panels to the Insert
INSTALLATION OF PANEL SET AND TRIM
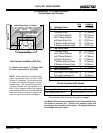
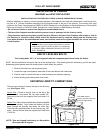
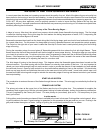
DOOR HANDLE ASSEMBLY
1. Install washer on door handle shaft.
2. Slide door handle through door.
3. Install second washer(s) as shown.
4. Install key in groove.
5. Align groove in latch cam with key; slide
latch cam over shaft.
6. Install locknut.
Caution! Do not overtighten locknut.
Door handle needs to move smoothly.
7. Install spring handle turning counter-
clockwise to desired location on handle.
Locknut
Door Cross Section
(example)
Latch Cam
Spacing
Washers
Square Key
Door Handle
Spring
Handle
SP-31S-NL Std, Nickel 44-5/8” x 30-1/2”
SP-31L-NL Large, Nickel 50-1/2” x
34-1/2”
Part No. Description Size
Part No. Description Size
View of “L” Bracket Installed