


16
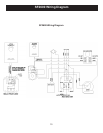
Special Instructions
Hot Water Out
Cold Water In
Pressure
Relief Valve
Existing Water
Heater
Rear Of
Furnace
Automatic
Air Valve
Pressure
Relief Valve
(Must be within
2 feet of coil)
10 Feet Maximum
Drain
Valve
1
2
3
3
4
5
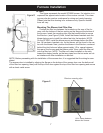
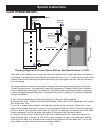
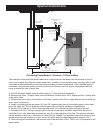
Plumbing Diagram For Thermo-Siphon Method - Maximum Distance = 10 Feet
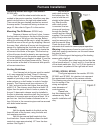
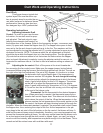
Place one of the supplied nuts on each leg of the coil. Place the coil through the holes on the back of
the furnace, and adjust the nuts so that the pipes stick out about 1¼ to 1½ inches from the rear of the
furnace.Placetheatwashersandgasketsovereachpipeandtightenthenuts.Youarenowready
to run the piping.
This simple method is the most economical. However, the existing water heater must be less than
10 feet from the furnace. The water inlet, where the Temperature / Pressure Relief valve is located,
must be higher than the top leg of the water coil. The water heater should be elevated, if necessary,
to allow for proper thermo-siphon action.(The method by which hot water will circulate automatically
through the system.)
A. Shut off the water heater and the water supply to it. Drain the tank completely.
B. Remove the Temp. / Presure relief valve and discard. Install a short 3/4 in. nipple and tee (1) along
with a new relief valve.
C. run 3/4 in. copper tubing between the water tank and the top leg of the coil. Install a 3/4 in vent
elbowandautomatic“oattype”airvent(2)inthehighpointoftheline.Within2feetofthetoplegof
the coil, install a 150 lb. pressure relief valve (5). Run 3/4 in. tubing from the release exit of both relief
valves downward (3) so the hot water can escape in the event of an overheat situation.
D. Remove the drain valve, at the bottom of the tank. Install a short 3/4 in. nipple and tee and re-
install the drain valve to the tee (4). Run 3/4 in. tubing between the drain / tee combination and the
lowerlegofthewatercoil.Afteralloftheconnectionsaresecured,rellthewatertank.Turn on the
water heater only after the tank has been completely relled.
Coil Installation: