


Page 4SKU 95588
For technical questions, please call 1-800-444-3353.
UNPACKING
When unpacking, check to make sure that the item is intact and undamaged. If any
parts are missing or broken, please call Harbor Freight Tools at the number shown on the
cover of this manual as soon as possible.
ASSEMBLY AND OPERATING INSTRUCTIONS
Note: For additional information regarding the parts listed in the following pages, refer to
the Assembly Diagram near the end of this manual.
WARNING! Make sure the Power Switch of the product is in its “OFF” position
before making any adjustments to the product.
Decide where you want to place the Solar Light Set. Choose a location that receives
full, direct sunlight a minimum of six hours a day. The location should not be near
nighttime light sources such as porch lights or streetlights as this will cause the
Solar Light Set to remain off.
The Solar Light Set will need to charge for at least twelve hours before using it for
the first time. Allow to charge for two sunny days before the Solar Light Set is fully
charged. During initial charging, set the switch to “Off”.
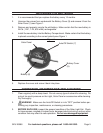
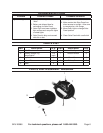
Located underneath the Battery Cover (9) is a Auto/Off Switch (7). The Switch can
be set to either “Auto” or “Off”. Set the Auto/Off Switch to “Auto.”-see Figure 1 and
Parts Diagram.
Moving the Auto/Off Switch (7) to “Auto” will automatically turn on the Solar Light
during the night. After the initial charge is set, check to see that the Light (2) is on
by viewing the light at night or in a dark location. If the Light (2) is not lit, check the
position of the “Auto” Switch.
Note: During the day, the Solar Panel converts sunlight into electricity, recharging
the battery. The amount of light the Solar Panel receives depends on placement
of the Solar Light, geographic location and weather. If the weather is cloudy and
the panel did not receive a full charge, the Solar Garden Light may not achieve the
full hours of operating time. It will catch up on its own after two to three days of full
sun.
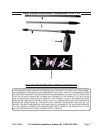
Set the Hummingbird, Dragonfly or Butterfly onto the Top Tube (3). Slide the Top
Tube (3), into the Bottom Tube (4). Slide the Stake (5) onto the Bottom Tube (4).
Push the Stake (5) directly into the ground. Make certain that the path of the Stake
(5) is clear of lines, cables and conduits.
1.
2.
3.
4.
5.
6.
7.
8.